Page 1 of 1
Assembly of Fun Projects Coilbox kit
Posted: Fri Apr 17, 2020 2:30 pm
by bill goodheart
I bought this kit about 3 years ago and am just getting around to installing. When trying to install the contact screw for the Battery and mag connection I realized that the contact screw heads were to big to fit in the recess on the back panel. The screws for the 8 other contacts work fine. I might be doing something wrong. I am installing this on my 1919 touring, non starter car. It is non electric but plan to use a battery for starting and run on the mag. I am doing a complete Frame up restoration. I will have the wood firewall with the switch mounted on the coil box. See attached foto.
Battery Terminal screw.JPG
Re: Assembly of Fun Projects Coilbox kit
Posted: Fri Apr 17, 2020 3:08 pm
by jab35
William: I assume yours is a FunProjects kit, referenced here:
http://www.funprojects.com/products/5000RK.aspx
The photo in the link shows a circular counterbore recess at the end of the channel to accommodate the carriage bolt head, your kit may not have that feature. I did a '26 kit some time back and everything fit perfectly, you may need to make a small modification with a wood chisel. Good Luck, stay safe, jb
Re: Assembly of Fun Projects Coilbox kit
Posted: Fri Apr 17, 2020 3:11 pm
by DanTreace
Put the kit in a later box without the switch on the box, but kit is the same.
The single terminal for the box w/o switch, and for later cars only used one of the terminals, for the mag. So there remains an empty hole.
The brass carriage bolt fit fine for me. Also notched or channeled that carriage bolt head to make recess for wire, then soldered it to the bolt.
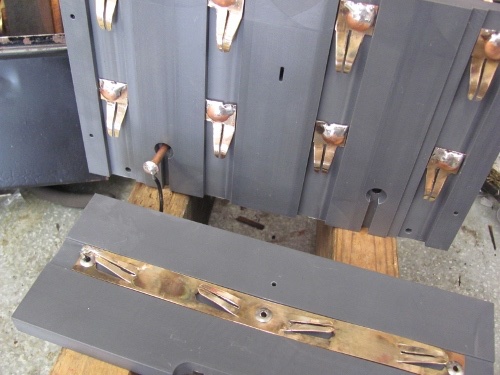
- IMG_7289 (500x375).jpg (91.04 KiB) Viewed 5731 times
Only used the single wire channel for the single magneto post input. Tape cover the junction for protection.
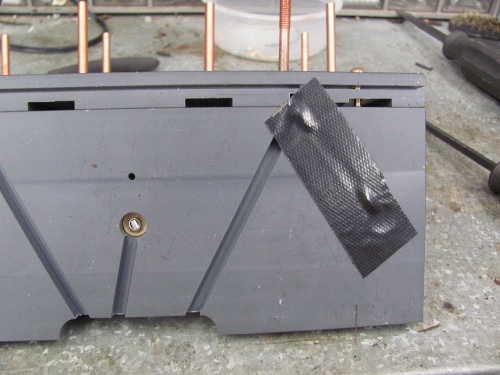
- IMG_7290 (500x375).jpg (95.23 KiB) Viewed 5731 times
Re: Assembly of Fun Projects Coilbox kit
Posted: Fri Apr 17, 2020 3:51 pm
by bill goodheart
James, my kit does indeed have the circular counterbore, it's just that the counterbore is not quite large enough for the terminal screw head. I guess I can put it on the drill press and enlarge the counterbore so the screw head will fit.
Re: Assembly of Fun Projects Coilbox kit
Posted: Fri Apr 17, 2020 3:53 pm
by Jerry VanOoteghem
bill goodheart wrote: ↑Fri Apr 17, 2020 3:51 pm
James, my kit does indeed have the circular counterbore, it's just that the counterbore is not quite large enough for the terminal screw head. I guess I can put it on the drill press and enlarge the counterbore so the screw head will fit.
Or, trim the screw head down?
Re: Assembly of Fun Projects Coilbox kit
Posted: Fri Apr 17, 2020 4:01 pm
by Piewagon
If that bolt is a copper plated steel bolt I would ditch it in favor of 10-32 Brass Pan head machine screws. The copper plated steel is correct original hardware but modern stuff you buy is about as good as copper colored paint over steel and it begins to rust almost from day one and really no good in pretty short time. The heads of ALL contact screws should be BELOW the height of the plastic surface or you will wreck the coils when you try to force them into a box where the contact bolt is too high. Only the curved split portion of any of the coil contacts should protrude ABOVE the plastic surface. The rest of the contact MUST be below the plastic surface if you have properly made coils and coil box. If the instruction sheet does NOT have Fun Projects name on it then you might have bought a copy cat version and those guys always cut corners and leave out details but of course it probably is cheaper but not at all cheaper if you wreck your coils. Most people have things WAY WAY too tight of a fit inside the coil box. The contacts are the only surfaces that have collision fit with the box parts. The grey stuff should have clearance when the coil goes in but it should slide in easy - not requiring force.
Re: Assembly of Fun Projects Coilbox kit
Posted: Fri Apr 17, 2020 4:20 pm
by bill goodheart
The kit and screws all came from Langs I assume it was a fun projects kit.
Re: Assembly of Fun Projects Coilbox kit
Posted: Fri Apr 17, 2020 4:35 pm
by Scott_Conger
Bill
John is the original owner of FunProjects, so he certainly speaks from authority. If the instructions don't say "Fun Projects" it may be a copy. In any event, I will make this suggestion: check all bolts for fit. This ONE bolt may be an errant oversize bolt/head which will work on any of the 4 pairs of contacts that go from/to the coils.
Re: Assembly of Fun Projects Coilbox kit
Posted: Fri Apr 17, 2020 5:06 pm
by Oldav8tor
The Fun Projects kit I bought went together beautifully.... great design and manufacture. I bought it last September from the new owners, Birdhaven.
Not long after installing it I got caught in a downpour in my open car while on the Covered Bridges tour. Nary a sputter so the electrics stayed dry.
Re: Assembly of Fun Projects Coilbox kit
Posted: Fri Apr 17, 2020 5:36 pm
by Ron Patterson
Bill
The Fun Projects kit does not include the 10 bolts.
The original ten Ford bolts have a head diameter of .354.
Those reproduction bolts have a head diameter of .448.
Chuck one of the repro bolts in a lathe and turn the head down to .354.
Check for proper fit
Cut a slot in the bolt head for the wire end and solder it.
Do not wrap the wire around the bolt or it will not seat properly into the square hole in the thermo-plastic.
Ron Patterson
Re: Assembly of Fun Projects Coilbox kit
Posted: Fri Apr 17, 2020 6:23 pm
by bill goodheart
Yes, I know that John Regan is the former owner of Fun Projects. I didn't realize that was his post until I went back and looked at again. I have a great deal of respect for John Regan and Fun Projects. I have read his posts many times, His electrical knowledge is unsurpassed. I looked at the instructions and it does say Fun Projects. I all also realized that screw is very close to fitting in the counterbore. The instructions say to drive it in place. I think it will fit if I tap it with a small hammer. I could touch up the screw head with a file to make it easier, but I don't want it to fit too loose.
My Model T knowledge is nearly nothing. I appreciate all the help everyone on the form has given me. I read the forum several times a day but seldom post, hoping to pickup more model T knowledge.
Re: Assembly of Fun Projects Coilbox kit
Posted: Fri Apr 17, 2020 6:59 pm
by Ron Patterson
Bill
If you turn down the bolt head diameter to the same diameter as a Ford bolt it is impossible to get it too lose.
You have to drive the square shank of all the screws into the thermo-plastic round bolt holes which will tighten them right it up and the nuts on the end of the bolts will hold them in place.
Ron Patterson
Re: Assembly of Fun Projects Coilbox kit
Posted: Fri Apr 17, 2020 8:27 pm
by bill goodheart
Should have read Ron Patterson's post before I posted. Turning down the bolt head is the answer. Thanks for all the help, Now I know what to do.