Page 1 of 2
Delivery Car Project Build
Posted: Sat May 21, 2022 8:36 pm
by Tbird
Well after about 10 years of collecting parts and research I've officially started on building my delivery car body. I do this kind of stuff when I have time and $. Thought you all would like to see the progress so far.
Here is all my body irons made up
I ordered some Ash wood from the local Amish mill for the sills and the rest of the platform.
I started with a square straight frame and it's great to see everything lining up where it should be. Once I finish the platform I'll move the platform to the body dolly I made to move it around easier to finish the construction.
Re: Delivery Car Project
Posted: Sat May 21, 2022 8:49 pm
by Michael A
Nice start Mike, thanks for sharing.
Keep us up to date with the progress.
Michael A
Re: Delivery Car Project
Posted: Sun May 22, 2022 12:37 am
by Chris Instness
Thanks for posting. I look forward to seeing the progress on this one!
Re: Delivery Car Project
Posted: Sun May 22, 2022 2:58 am
by Allan
Mike, I too look forward to seeing your build. Have you been collecting parts for a genuine Ford delivery body? My 1912 van is a faithful replica of a Duncan and Fraser built body, so I didn't have the constraints of finding exact ironwork pieces.
Keep up the excellent work.
Allan from down under.
Re: Delivery Car Project
Posted: Sun May 22, 2022 9:29 am
by Dallas Landers
Looking good. Waiting for more. Its great watching these builds.
Re: Delivery Car Project
Posted: Sun May 22, 2022 1:46 pm
by Tbird
Allan wrote: ↑Sun May 22, 2022 2:58 am
Mike, I too look forward to seeing your build. Have you been collecting parts for a genuine Ford delivery body? My 1912 van is a faithful replica of a Duncan and Fraser built body, so I didn't have the constraints of finding exact ironwork pieces.
Keep up the excellent work.
Allan from down under.
Allan, yes I’ve been collecting parts for a 12 delivery. Some of the hard ones were the tail light bracket and the rear fender irons. I had both of them recasted. The other hard part was the rear door hinges. The hinges are 4 knuckle butt hinges, finding a place here in Elkhart IN that would be willing to bend them for me was a little difficult. Elkhart is the trailer/RV capital and there are several factories that do door hinges, but finding one that would do a small run and work with me took some time. The rear door handle I have is a 11-12 Model t handle that has been modified to accomplish the door mechanism as laid out in the blue prints. Originally it was casted in iron and simply painted black, I choose to go with a brass door handle.
Re: Delivery Car Project
Posted: Sun May 22, 2022 7:03 pm
by Ron Patterson
Is it a 1912 Ford body made by Baudette Company delivery car you are building?
Ron Patterson
Re: Delivery Car Project
Posted: Sun May 22, 2022 7:08 pm
by Ron Patterson
Is yours a 1912 Ford Baudette body delivery car?
Ron Patterson
Re: Delivery Car Project
Posted: Sun May 22, 2022 7:49 pm
by JTT3
Mike are you using ash? No mater what wood you’re using you may consider using a waterproofing chemical & sealer for long term protection while you can get to every piece.
Re: Delivery Car Project
Posted: Sun May 22, 2022 8:13 pm
by Tbird
Ron Patterson wrote: ↑Sun May 22, 2022 7:03 pm
Is it a 1912 Ford body made by Baudette Company delivery car you are building?
Ron Patterson
Ron,
That’s the plan…
Re: Delivery Car Project
Posted: Sun May 22, 2022 8:15 pm
by Tbird
JTT3 wrote: ↑Sun May 22, 2022 7:49 pm
Mike are you using ash? No mater what wood you’re using you may consider using a waterproofing chemical & sealer for long term protection while you can get to every piece.
John,
Yes the sill runners, and floor is ash. The body framing will be made out of hard maple. Are you suggesting like a Marine type of sealer?
Re: Delivery Car Project
Posted: Sun May 22, 2022 9:03 pm
by Scott_Conger
Personally, I thinned SPAR varnish 50/50 with turpentine and wiped on 3 or 4 coats. I've been very happy with the result
One extra thing I did when I rewooded my car, is on the floor boards and trunk floor of my runabout, I made the floorboards as lap joints, trailing on the bottom so that no water can make it's way past the labyrinth it forms. The boards look to be correctly dimensioned when viewed either from the top or the bottom...just that you cannot see past them and water must really work hard to get through, too. Now that the boards have shrunk slightly I am even more pleased than ever that neither eyeballs nor rain/mud can get past...
Re: Delivery Car Project
Posted: Mon May 23, 2022 5:35 am
by Allan
Penetrol is made for the sealing, proofing, and priming of bare timber. Clear finished can be applied over it It can also be added to oil based paints to extend them, aid in adhesion and even out brush strokes. Look it up and see where it is available.
Allan from down under.
Re: Delivery Car Project
Posted: Mon May 23, 2022 11:23 am
by Dollisdad
What a great project and off to a great start. I wish I had followed mine but too late now. You will enjoy this build a lot. And so, will we.
Re: Delivery Car Project
Posted: Mon May 23, 2022 12:13 pm
by Dallas Landers
Mike this is exciting to me also. If you want a look at my wood cab build search Martin Parry cab build part two. 8in1 convertible truck body rebuild I think covers the bed. Post all the photos you can and it will help future projects. Dont forget mtfca in search
Re: Delivery Car Project
Posted: Mon May 23, 2022 4:01 pm
by Tbird
Thanks guys for your encouragement and advice. I’m mocking up the floor runners and floor boards for seat risers. I’m using some scrap wood to do trial fits before I cut any of my lumber for the project. It’s been helpful to have many of the body irons and front floor boards so I can get accurate measurements. All the measurements are from the Benson Ford Research Center. BTW I’m making notes and taking pictures and videos of all this stuff that you don’t see on the plans from the BFRC and plan on making patterns.
Re: Delivery Car Project Build
Posted: Mon May 23, 2022 7:38 pm
by Allan
Mike, now is the time to consider one departure from original, if you like. My van is terribly cramped behind the wheel, and I am only 5' 8". If I was building it now, I would shift the seatback to the rear a couple of inches. When I built my 1917 shooting brake, I did this, and even made the rake adjustable. It's a much nicer car to drive as a result. We are all mostly taller and heavier than our 100 year old predecessors.
Allan from down under.
Re: Delivery Car Project Build
Posted: Mon May 23, 2022 8:41 pm
by Scott_Conger
Allan
what great advice!!
my dad has a depot hack and for the life of me, that is one uncomfortable car to drive because of the cramped seat position
Re: Delivery Car Project Build
Posted: Mon May 23, 2022 11:05 pm
by Allan
All it meant was making the seat support frame 2"wider to the rear. The seal back is hinged to it. I made a pair of fixtures with 3 x 1/2" spacers and knurled nuts to adjust the rake. Three spacers gave me 4 positions. I set it about where I felt it was comfortable for me, and it has been there ever since.
Allan from down under.
Re: Delivery Car Project Build
Posted: Mon May 23, 2022 11:40 pm
by Tbird
Allan wrote: ↑Mon May 23, 2022 11:05 pm
All it meant was making the seat support frame 2"wider to the rear. The seal back is hinged to it. I made a pair of fixtures with 3 x 1/2" spacers and knurled nuts to adjust the rake. Three spacers gave me 4 positions. I set it about where I felt it was comfortable for me, and it has been there ever since.
Allan from down under.
I’d love to see a picture of this
Re: Delivery Car Project Build
Posted: Tue May 24, 2022 5:24 am
by Allan
I'll get some for you tomorrow, details of the hinge, the seat back panel, and the rake adjusters, if I remember!!
Allan from down under.
Re: Delivery Car Project Build
Posted: Wed May 25, 2022 9:36 pm
by Tbird
I spent most of the evening tonight dialing in all the measurements. I was having a difficult time trying to figure out the width of the rear floor board that the seat riser attaches to in the rear. I was being thrown off by 5/8" that was missing in my layout somewhere. After looking over the blueprints again and again I found the missing 5/8 on the blueprints! Crazy that I have looked at those things a lot and never saw it... I was able to make the final adjustments to my mock up and everything lines up exactly where it should be. The blueprints don't show the dimensions for the total length of the floor runners, rear floor board for the seat riser, and the distance between the the front and rear seat risers. Figuring these two dimensions out gives you the length of the floor runners which now I have. Next I'll start making cuts in my scrap wood to dial in the exact cuts and exactly how to do them. The floor runners are the most complex with rabbets on the inside, bevel cuts on the sides, round overs on the front after the front seat and a taper swoop up to the firewall. More to come....
Re: Delivery Car Project Build
Posted: Thu May 26, 2022 1:29 am
by Allan
Here you go Mike. The seat back has a frame, and thinner boards are rebated into it from the front. The seat springs are attached directly to the boards. I set the hinge into the base board so the seat cushion does not foul on it.
The rake adjuster bolt goes through the pillar from the front. 3 x 1/2" spacers go over the bolt so multiple take angles are available. The knurled nut allows easy adjustment, although I have not needed to shift it from the initial setting. I made all the bits for this, smithing the iron bits from old iron, and using alloy rod for the spacers. The knorled nuts were in my cache of stuff.
Hope this helps.
Allan from down under.
Re: Delivery Car Project Build
Posted: Thu May 26, 2022 7:13 am
by Tbird
Allan,
Very intrigued! From the looks of it the adjuster is underneath so you can’t see it. Here is what I’m running up against if I were to do something like this. The seat risers and seat frame pieces have two brackets bolted on top of the seat frame that in turn bolt to the ribs on the side of the body and onto the structure that makes up the seat. Also the seat back has two pieces of wood that is at a slant that is bolted to the rear seat riser on the top and bottom. I also thought of moving the seat risers back about a couple inches but because the seat risers are placed by the pillars if I were to move the side pillars back it would throw off the way the sides are shaped. Photos are from the delivery body that Bill Brommer (RIP) made for Craig Beek.
Re: Delivery Car Project Build
Posted: Thu May 26, 2022 7:36 am
by Allan
Mike, the timber through which the adjuster bolt passes is the vertical body pillar at the back of the front seat. The bracket is at the top of the adjustable seat back, behind the seat.. I took the photo from behind the seat, looking forward.
On the framework of that build you show, the equivalent vertical timber is the first full height one from the front. The flat steel piece is fixed to the seat back, with the piece extending out behind the vertical body member. The only modification you might need to make is to delete the vertical seat back timbers, and maybe make the frame which sits on the seat risers a couple of inches wider at the back.
Let me know if this is not clear.
Allan from down under.
Re: Delivery Car Project Build
Posted: Fri May 27, 2022 5:16 pm
by Tbird
Well I spent most of the day cutting the wood for the floors. The floor runners are pretty complex with the amount of cuts needed. The floor runners go from the front of the firewall to the rear floor board. They involve bevel cuts on the outside part way up to the front seat riser then a tapered cut that you can see I made a pattern for in the picture below. The floor runners also have a rabbet that runs part way up to the rear seat riser. This build has really stretched me in my carpentry skills. I still have to cut the other rabbet and my tapers and then I can fasten the floor runners to the sill runners and install the rest of the floor.
Re: Delivery Car Project Build
Posted: Fri May 27, 2022 5:17 pm
by Tbird
Re: Delivery Car Project Build
Posted: Fri May 27, 2022 11:21 pm
by Tbird
I added some videos and will continue to add them to my YouTube channel as I make more progress
https://www.youtube.com/channel/UCrzL-a ... Tp6OJLwv-w
Re: Delivery Car Project Build
Posted: Sat May 28, 2022 7:26 pm
by DaveB
Craig Beek has a real nice one and am sure he would share any head scratching measurements, Moline Illinois and his was Senior Grand National Winner.
Re: Delivery Car Project Build
Posted: Sun May 29, 2022 8:22 am
by Tbird
DaveB wrote: ↑Sat May 28, 2022 7:26 pm
Craig Beek has a real nice one and am sure he would share any head scratching measurements, Moline Illinois and his was Senior Grand National Winner.
Dave, the one Craig Beek has was made by Bill Brommer. Bill made 3 bodies. His personal, Craig’s and another guy out in CA has one. The drawings from the BFRC show most of the measurements, you have to do some math to figure out the rest.
Re: Delivery Car Project Build
Posted: Sun May 29, 2022 9:00 pm
by Tbird
Worked on a few little details today. I got my seat riser floor boards done and started to mock up the front floor board firewall risers. Hope to have the platform completed this week but we’ll see…
Re: Delivery Car Project Build
Posted: Sat Jun 04, 2022 2:51 pm
by Tbird
Did a little more work on the Delivery car floor. I had to make several patterns of the area where the floor runners swoop into the firewall. Looking at several pictures I’ve settled on what I wanted it to look like, I think I’ve come really close to what looks correct. The floor runners are very complex with the amount of cuts and details needed to complete the platform. I’m not finished yet with the platform but getting closer…
Re: Delivery Car Project Build
Posted: Wed Jun 22, 2022 6:23 pm
by Tbird
Re: Delivery Car Project Build
Posted: Wed Jun 22, 2022 6:54 pm
by speedytinc
A good saw blade shop has the blade by the foot & electrically butt welds into a loop.
My old wood shop class had a welding attachment right on the saw.
Re: Delivery Car Project Build
Posted: Fri Sep 02, 2022 2:55 pm
by Tbird
I began cutting my pillars for the sides of the body. The pillars are made from 1 1/2" thick Hard Maple. There is a lot of joinery steps to form the finished sides of the pillars. I have been covering the build quite extensively on YouTube if you'd like to follow along.
https://www.youtube.com/channel/UCrzL-a ... Tp6OJLwv-w
Re: Delivery Car Project Build
Posted: Wed Oct 05, 2022 3:33 pm
by Tbird
Finished up the pillars today for the Delivery car. The pillars are all different heights and have tapers, notches, and angle cuts on them. Will be mounting them hopefully this weekend.
Re: Delivery Car Project Build
Posted: Thu Oct 27, 2022 8:01 pm
by Tbird
Took advantage of the warmer weather this week and made some more progress. Got the side pillar brackets mounted in place. You can start to see the body taking shape. I positioned the pillars in place but not have mounted them yet. Currently I’m working on the rear door jambs. I had to face glue several pieces of maple together so I could cut out the curved door jambs. The front pillars are not that long, they need to be cut down but I will not do so until the horizontal rib is put in.
Re: Delivery Car Project Build
Posted: Thu Oct 27, 2022 8:02 pm
by Tbird
Re: Delivery Car Project Build
Posted: Sat Oct 29, 2022 10:05 pm
by Tbird
It’s been unusually warm here in northern Indiana and had several days to be able to work outside. Making some more progress on the rear door jambs and got the top of the jambs cut out and shaped. These pieces will allow me to make the rear doors and the top bows.
Re: Delivery Car Project Build
Posted: Sat Oct 29, 2022 10:51 pm
by JTT3
………………………..
Re: Delivery Car Project Build
Posted: Sun Oct 30, 2022 4:49 pm
by Tbird
Thanks John! It’s been a very fun project.
Re: Delivery Car Project Build
Posted: Sat Nov 19, 2022 6:42 pm
by Tbird
Making some more progress this week. I was able to complete the seat risers, and seat frame pieces. I also was able to get some more pieces ready for the joinery that will be mounting the C section to the roof and the horizontal rib that runs down the middle of the delivery car. I finished up this week with mounting more body irons and lots and lots of slotted screws!
Re: Delivery Car Project Build
Posted: Sat Nov 19, 2022 6:43 pm
by Tbird
Re: Delivery Car Project Build
Posted: Sat Nov 19, 2022 6:46 pm
by Tbird
Re: Delivery Car Project Build
Posted: Sat Nov 19, 2022 6:48 pm
by Tbird
Re: Delivery Car Project Build
Posted: Sun Nov 20, 2022 1:19 am
by Allan
Lovely work Mike. It is great to see it come together. How does the seat base accommodate the brackets and bolt heads that attach the irons to the side pillars? They make seating the seat base somewhat more difficult.
From the photos of the almost complete body you posted earlier, there appear to be only two vertical timbers for its seat backrest. Does that indicate that the seatback is only for the driver and the other side is left open to accommodate longer items? Those same two risers are inset into the seat riser base by an inch or so bringing the seatback forward by at least that much. I would be checking your seating position before going much further. I know I keep on about this, but having a comfortable driving position makes it so much more enjoyable to use your T, and now is the time to do it.
Allan from down under.
Re: Delivery Car Project Build
Posted: Mon Nov 21, 2022 8:23 am
by Tbird
Allan wrote: ↑Sun Nov 20, 2022 1:19 am
Lovely work Mike. It is great to see it come together. How does the seat base accommodate the brackets and bolt heads that attach the irons to the side pillars? They make seating the seat base somewhat more difficult.
From the photos of the almost complete body you posted earlier, there appear to be only two vertical timbers for its seat backrest. Does that indicate that the seatback is only for the driver and the other side is left open to accommodate longer items? Those same two risers are inset into the seat riser base by an inch or so bringing the seatback forward by at least that much. I would be checking your seating position before going much further. I know I keep on about this, but having a comfortable driving position makes it so much more enjoyable to use your T, and now is the time to do it.
Allan from down under.
Allan, so the seat frame/base is simply attached to the risers with wood screws, there are two long brackets on either side of the seat frame that mount to the seat frame and side post. Those long brackets are mounted with two carriage bolts that come up from the bottom of the rear seat frame piece that is overhanging from the back of the rear seat riser. The rest of the iron mounts to the pillar using #10 1" wood screws. You would be correct in noting that there are only two vertical timbers for the seat back rest. The back rest timers are 2" wide at the top of the seat frame and then taper to 5/8" at the bottom and the top to make for a angled back rest. Those seat back timbers are attached to the seat riser with two carriage bolts on each side of the timbers. I Could make the seat back at a greater angle by making them wider at the top of the seat riser 3-4" and then tapering them down to 5/8".
Re: Delivery Car Project Build
Posted: Mon Nov 21, 2022 12:23 pm
by Jerry VanOoteghem
Mike,
Beautiful work! I've got to ask however, are you planning to trim the lengths of these bolts at some point? It would make these joints look as neat and professional as everything else you've done.
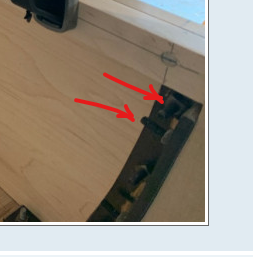
- bolts2.png (63.08 KiB) Viewed 79338 times

- bolts.png (106.24 KiB) Viewed 79338 times
Re: Delivery Car Project Build
Posted: Mon Nov 21, 2022 3:10 pm
by Tbird
Jerry VanOoteghem wrote: ↑Mon Nov 21, 2022 12:23 pm
Mike,
Beautiful work! I've got to ask however, are you planning to trim the lengths of these bolts at some point? It would make these joints look as neat and professional as everything else you've done.
bolts2.pngbolts.png
Jerry,
Yes all the bolts will be trimmed to final length. I will not trim them until I do final assembly of the body. Everything can be taken apart still with exception of a few pieces. I still have to prep the wood so it can be painted/stained and areas I want to make sure are prepared with a waterproofing/sealer on the underside. All the bolts after the body skin is in place will then receive final trimming.
Re: Delivery Car Project Build
Posted: Mon Nov 21, 2022 3:50 pm
by Jerry VanOoteghem
Tbird wrote: ↑Mon Nov 21, 2022 3:10 pm
Jerry VanOoteghem wrote: ↑Mon Nov 21, 2022 12:23 pm
Mike,
Beautiful work! I've got to ask however, are you planning to trim the lengths of these bolts at some point? It would make these joints look as neat and professional as everything else you've done.
bolts2.pngbolts.png
Jerry,
Yes all the bolts will be trimmed to final length. I will not trim them until I do final assembly of the body. Everything can be taken apart still with exception of a few pieces. I still have to prep the wood so it can be painted/stained and areas I want to make sure are prepared with a waterproofing/sealer on the underside. All the bolts after the body skin is in place will then receive final trimming.
Awesome! It's going to be a beautiful Delivery Car!
Re: Delivery Car Project Build
Posted: Thu Jan 12, 2023 3:03 pm
by Tbird
Making some more progress. Working on the horizontal piece that attaches to the side pillars. This piece is what will allow the metal skin to be attached to in two sections. The seam will be hidden by a piece of round moulding down the middle.
Re: Delivery Car Project Build
Posted: Thu Jan 12, 2023 3:07 pm
by Tbird
Re: Delivery Car Project Build
Posted: Thu Jan 12, 2023 3:12 pm
by Rich Eagle
That is beautiful work. I'm glad you are taking those pictures. The wood is so much fun to see.
Rich
Re: Delivery Car Project Build
Posted: Thu Jan 12, 2023 3:20 pm
by Tbird
Rich Eagle wrote: ↑Thu Jan 12, 2023 3:12 pm
That is beautiful work. I'm glad you are taking those pictures. The wood is so much fun to see.
Rich
Thanks Rich! Hopefully it will help someone else who may try to take on building a body or inspire someone of what can be accomplished.
Re: Delivery Car Project Build
Posted: Thu Jan 12, 2023 5:09 pm
by Allan
Mike, I see the side timbers fully rebated into the vertical members. Is that how the original bodies were constructed? To preserve strength in the uprights, my gut feeling would have the side timbers relieved and set into shallower cut-outs in the verticals. Perhaps it doesn't matter. You do lovely woodwork. Do you find it difficult to buy stock timber which reflects the heavier spec timbers of old? There's no way I can buy planks of old 1" [22mm]
boards. Everything these days is 19mm.
Allan from down under.
Re: Delivery Car Project Build
Posted: Thu Jan 12, 2023 5:26 pm
by Tbird
Allan,
Yes the drawings from Benson Ford clearly show that the side ribs are notched out to receive the horizontal piece that runs the length of the Delivery car. The side pillars are mounted to the floor with the metal braces and a screw from underneath the floor runners. There will be two more horizontal supports on the inside of the delivery car on the bottom section of the pillars, they were more for protection from cargo rolling around the back. I can get lumber if any width and thickness here where I live in northern Indiana up in Amish country.
Re: Delivery Car Project Build
Posted: Sat Jan 21, 2023 9:27 pm
by Tbird
Things are starting to take shape! Got the seat back all done. I mocked up where the steering column would be and pedals, both my wife and I were very comfortable. My wife asked where her seat was... lol I told her I'd be making a wider seat back that would stretch to the other side... Got the door jambs cut to follow the profile of the sides of the body along with the rear door jamb post section to finish the horizontal rib. To end out the evening tonight I was able to join the top header/roof section to the rear door jambs. I was pretty excited to get that piece done.
Re: Delivery Car Project Build
Posted: Sat Jan 21, 2023 9:28 pm
by Tbird
Re: Delivery Car Project Build
Posted: Sat Jan 21, 2023 9:28 pm
by Tbird
Re: Delivery Car Project Build
Posted: Sat Jan 21, 2023 9:29 pm
by Tbird
Re: Delivery Car Project Build
Posted: Sun Jan 22, 2023 6:40 am
by Dallas Landers
Looking good.
Re: Delivery Car Project Build
Posted: Sun Jan 22, 2023 8:38 am
by BUSHMIKE
Fantastic work! Love watching the build.
Re: Delivery Car Project Build
Posted: Mon Jan 23, 2023 9:38 pm
by Tbird
Some exciting things happening!
Made a cardboard template for the roof rails. I can’t believe this thing is in my garage!
Re: Delivery Car Project Build
Posted: Mon Jan 23, 2023 10:35 pm
by Bob McDaniel
Tbird wrote: ↑Mon Jan 23, 2023 9:38 pm
Some exciting things happening!
Made a cardboard template for the roof rails. I can’t believe this thing is in my garage!
EEE60391-96BA-4084-ACDD-BB6D1070F146.jpeg
3EF261FA-FCF1-4EB9-B340-961DBDB7A663.jpeg
E73EDB9D-F7A0-4624-950F-9C91FE70CB89.jpeg
52542840-3BA7-4B57-8910-A986AAEF555A.jpeg
I hope it clears the door opening or it will be in your garage a loooong time!
Looking good

Re: Delivery Car Project Build
Posted: Mon Jan 23, 2023 10:45 pm
by Tbird
Bob... LOL

Re: Delivery Car Project Build
Posted: Mon Jan 30, 2023 12:27 pm
by Tbird
Just a little teaser of what I’ll be working on next
Re: Delivery Car Project Build
Posted: Mon Jan 30, 2023 12:54 pm
by Scott_Conger
OK, I'll bite: I think your next project is a taller garage door !
Re: Delivery Car Project Build
Posted: Mon Jan 30, 2023 2:58 pm
by JTT3
Mike just bite the bullet and mount the wheels from the table to your sills of the body, ha, what could go wrong? On another note looking at the set of pictures prior to your last post, I would set the bicycle roof rack a little further back, the current position will decrease the aerodynamics of the body.
Keep up the hard work, proud of you brother.
Re: Delivery Car Project Build
Posted: Mon Jan 30, 2023 3:33 pm
by Jerry VanOoteghem
Looks as if you've taken the time to get the "C" curve formed perfectly! Many of these projects fall flat when it comes to laying out a nice, smooth, continuous curve. Not an easy thing to do, especially since french curves rarely come that large.

Re: Delivery Car Project Build
Posted: Mon Jan 30, 2023 4:11 pm
by Tbird
Scott_Conger wrote: ↑Mon Jan 30, 2023 12:54 pm
OK, I'll bite: I think your next project is a taller garage door !
Good one Scott! Lol
Re: Delivery Car Project Build
Posted: Mon Jan 30, 2023 4:13 pm
by Tbird
JTT3 wrote: ↑Mon Jan 30, 2023 2:58 pm
Mike just bite the bullet and mount the wheels from the table to your sills of the body, ha, what could go wrong? On another note looking at the set of pictures prior to your last post, I would set the bicycle roof rack a little further back, the current position will decrease the aerodynamics of the body.
Keep up the hard work, proud of you brother.
John,
Yea that could be a problem…may need one of those folding bicycles!
Re: Delivery Car Project Build
Posted: Mon Jan 30, 2023 4:15 pm
by Tbird
Jerry VanOoteghem wrote: ↑Mon Jan 30, 2023 3:33 pm
Looks as if you've taken the time to get the "C" curve formed perfectly! Many of these projects fall flat when it comes to laying out a nice, smooth, continuous curve. Not an easy thing to do, especially since french curves rarely come that large.
Jerry,
The roof and the rear doors are probably the most challenging sections of this build. I’ve went through several templates to try to get the C section and the curve of the roof just to mate up correctly. I’m almost there… thanks for your encouragement!
Re: Delivery Car Project Build
Posted: Mon Jan 30, 2023 7:43 pm
by Allan
Mike, I made a much shallower compound roof curve when building my shooting brake. The key to making it uniform lay in the straight, consistent grain in the western red cedar laths. Each bends at the same rate when fitted over the rials across the body. I used brass crews at the ends of the laths, and at the bottom of the downwards curve behind the cab. Elsewhere, brass tacks were used to hold them in place.
I spaced my laths, the gaps being equal to the laths. The burlap covering under the canvas top shows between the laths. Do the Ford delivery cars have a complete covering of the laths?
Allan from down under.
Re: Delivery Car Project Build
Posted: Mon Jan 30, 2023 7:58 pm
by Tbird
Allan wrote: ↑Mon Jan 30, 2023 7:43 pm
Mike, I made a much shallower compound roof curve when building my shooting brake. The key to making it uniform lay in the straight, consistent grain in the western red cedar laths. Each bends at the same rate when fitted over the rials across the body. I used brass crews at the ends of the laths, and at the bottom of the downwards curve behind the cab. Elsewhere, brass tacks were used to hold them in place.
I spaced my laths, the gaps being equal to the laths. The burlap covering under the canvas top shows between the laths. Do the Ford delivery cars have a complete covering of the laths?
Allan from down under.
Allan,
So the roof slats (laths) are 5/16” thick and 1” wide. There is 25 of them. I don’t have the spacing measurement yet but plan on making a comb jig which is just a simple piece of wood the width of the roof with dowel rods that will mark the spacing. The slats are covered with batting and then duck cloth followed up by a canvas stain. Duck cloth is a water resistant material that is woven tighter than regular canvas. Interesting fun facts duct tape was originally made of duck cloth with adhesive on the back and Levi jeans a long time ago use to be made of duck cloth but we’re then replaced by denim which has a different weave.
Re: Delivery Car Project Build
Posted: Wed Feb 01, 2023 12:33 am
by Allan
Mike, the batting I use is 1/4" thick white polyester which quilters use in their handiwork. Off the roll it is wide enough for the top. Being polyester, it is not affected by moisture, like original cotton/wool batting. The natural coloured burlap keeps it out of sight..
There is an escape route if you don't quite get the spacings right. A bit wider laths on the outer sides is camouflaged by the side timbers!
I enjoy your work immensely.
Alllan from down under.
Re: Delivery Car Project Build
Posted: Wed Apr 12, 2023 10:29 pm
by Tbird
The weather has been nicer and was able to finish up some of the honey do projects around the house before I could work on the Delivery Car again. It's been slow work, but finally was able to make some more progress. Mostly been working on some interior pieces, fender mounting blocks, and tackling the rear doors. The drawings hardly show any dimensions and details so a lot of mock-ups and drawings were sketched out before I could get my mind wrapped around how to construct the doors. The doors are curved as well and have some bracing that is curved but is notched and joined together with the rest of the door. Here's some more pictures.
Re: Delivery Car Project Build
Posted: Wed Apr 12, 2023 10:30 pm
by Tbird
Re: Delivery Car Project Build
Posted: Thu Apr 13, 2023 11:29 am
by Rich Eagle
I'll say it again, "The wood is so much fun to see".
Your craftsmanship is superb, and the wood is so beautiful.
Thanks for the opportunity to see it at these stages.
Rich
Re: Delivery Car Project Build
Posted: Thu Apr 13, 2023 10:06 pm
by Tbird
Rich Eagle wrote: ↑Thu Apr 13, 2023 11:29 am
I'll say it again, "The wood is so much fun to see".
Your craftsmanship is superb, and the wood is so beautiful.
Thanks for the opportunity to see it at these stages.
Rich
Thanks Rich! That means a lot coming from a awesome pattern maker like you!
Re: Delivery Car Project Build
Posted: Fri Apr 14, 2023 11:54 am
by Rich Eagle
Thanks Mike. Wood is so much fun to work and makes the shop smell wonderful. The kids remember waking up to the AARRUMMMMPH!!! of the planer first thing in the morning. You are so lucky to have that project. Keep up the good work.
Rich
Re: Delivery Car Project Build
Posted: Fri Apr 14, 2023 10:55 pm
by Allan
Mike, do you know if the original door vertical timbers were cut back to back from solid timbers? I can understand why you chose to make them the way you did. It would require a very solid piece of lumber to start with if they were to be made in one piece.
When I built my two shooting brakes, one 1927 and my later on a 1917 model, I cut the top side planks to their curved profile from flat planks.To get them to bend in at the front to align with the windscreen i used a trick an old timer suggested. I passed the front end of the boards over my sawbench, making a cut in the middle of the board, feeding it through until the cut no longer came out on the other side. Then I made a filler piece from the same timber and fitted it in the sawcut.
To make a 3"bend required a 3" timber to clamp the side boards to on my workbench. The filler was glued on each side and inserted in the sawcut. Then, with the board clamped to the 3" spacer, the front of the cut end with the spacer was clamped down to the bench until the glue dried. In effect, the front of the board was laminated. This eliminates any cross grain weakness in cutting curves from solid timbers. No_one has ever picked how the bends were made, but some have been intrigued when it is pointed out to them.
I mention this only because it may be of use to others where a bend in timbers would lead to a more pleasing, less boxy design.
I look forward to the paneling of your piecart, even though it will hide much of your craftsmanship.
Allan from down under.
Re: Delivery Car Project Build
Posted: Sat Apr 15, 2023 5:28 am
by DickC
You are a little ways from making and installing the seat bottom but I wanted to tell you what I did on my original Depot Hack. The leather seat bottom got very warn and rather ugly from removing it when getting access to the gas tank. I made a new seat 3/4 of an inch narrower. I used a brass piano hinge along the front, this lets me move the seat forward to access the gas tank without removing the seat and damaging the leather over time. Just something for you to consider. Dick C.
Re: Delivery Car Project Build
Posted: Mon Apr 24, 2023 10:54 pm
by Tbird
Allan wrote: ↑Fri Apr 14, 2023 10:55 pm
Mike, do you know if the original door vertical timbers were cut back to back from solid timbers? I can understand why you chose to make them the way you did. It would require a very solid piece of lumber to start with if they were to be made in one piece.
When I built my two shooting brakes, one 1927 and my later on a 1917 model, I cut the top side planks to their curved profile from flat planks.To get them to bend in at the front to align with the windscreen i used a trick an old timer suggested. I passed the front end of the boards over my sawbench, making a cut in the middle of the board, feeding it through until the cut no longer came out on the other side. Then I made a filler piece from the same timber and fitted it in the sawcut.
To make a 3"bend required a 3" timber to clamp the side boards to on my workbench. The filler was glued on each side and inserted in the sawcut. Then, with the board clamped to the 3" spacer, the front of the cut end with the spacer was clamped down to the bench until the glue dried. In effect, the front of the board was laminated. This eliminates any cross grain weakness in cutting curves from solid timbers. No_one has ever picked how the bends were made, but some have been intrigued when it is pointed out to them.
I mention this only because it may be of use to others where a bend in timbers would lead to a more pleasing, less boxy design.
I look forward to the paneling of your piecart, even though it will hide much of your craftsmanship.
Allan from down under.
From talking with John Regan the curved pieces were face glued blocks of wood. What you're saying though about cutting the wood totally makes sense, I just found it easier to face glue them and cut out the curve. I'm not too sure the body makers would have taken the time to do as your describing (I could be wrong thought) since the delivery cars were painted the red body color inside and out so you would not see the difference in the grain in the wood when the wood was painted. However, I will be staining the inside of the body wood and so the difference in the grain will show. I'm going to try my best to have it look really sharp and not stand out as much. I'm planning on using a cherry stain either from Old Masters gel stain or a cherry stain from Laurel Mountain Stain. I saw Frank Seress' Town Car done up in the cherry stain from Old Masters and it looks sweet. I'm planing on painting it the dark midnight blue.
Re: Delivery Car Project Build
Posted: Mon Apr 24, 2023 10:56 pm
by Tbird
DickC wrote: ↑Sat Apr 15, 2023 5:28 am
You are a little ways from making and installing the seat bottom but I wanted to tell you what I did on my original Depot Hack. The leather seat bottom got very warn and rather ugly from removing it when getting access to the gas tank. I made a new seat 3/4 of an inch narrower. I used a brass piano hinge along the front, this lets me move the seat forward to access the gas tank without removing the seat and damaging the leather over time. Just something for you to consider. Dick C.
Thanks Dick for the advice! Great idea! I'm still working out what I want the seat bottom to look like and how comfortable I want it.
Re: Delivery Car Project Build
Posted: Sat May 20, 2023 8:26 am
by Tbird
Worked on getting the rear door latch assembly put together and mounted. I'm simply amazed at the simplistic mechanical function they used back then.
Re: Delivery Car Project Build
Posted: Sun May 21, 2023 4:26 am
by Allan
The rear door latch mechanism works so well, the exact same set-up was used in the 1960's Morris/Austin mini vans. The rods simply pushed through holes in the floor and the top reveal, and when they wear they rattle like all he'll was breaking loose. Yours should not do that!!!
Allan from down under.
Re: Delivery Car Project Build
Posted: Sun May 21, 2023 7:33 pm
by Tbird
Allan,
I had no idea about that… next time I see one I’ll have to look.
Re: Delivery Car Project Build
Posted: Wed Aug 02, 2023 9:29 pm
by Tbird
Finally got the roof rails cut out and got the top bows (9 of them) cut out and fastened. Next to finish will be the “C” sections, which will then finish the whole profile of the body. Getting closer!
Re: Delivery Car Project Build
Posted: Thu Aug 03, 2023 12:29 am
by Bob McDaniel
Mike,
It's looking really nice but I had to zoom in on what looked like a FOR SALE sign on the seat. Turned out to be something orange on a newspaper

Re: Delivery Car Project Build
Posted: Thu Aug 03, 2023 7:05 am
by Tbird
Bob,
That’s actually a copy of the Model T Times lol
Have been getting a lot of neighbors asking what I’m building… some think it’s a horse drawn carriage or Amish buggy.
Re: Delivery Car Project Build
Posted: Sat Aug 12, 2023 9:31 am
by Tbird
Some more progress...
Made up the templates for the "C" pieces
Put on the leather door straps
Mounted the fender blocks for the rear fender irons to bolt to
Re: Delivery Car Project Build
Posted: Sat Aug 12, 2023 9:34 am
by Tbird
Re: Delivery Car Project Build
Posted: Sat Aug 12, 2023 1:32 pm
by JTT3
Mike, really a nice build you have going on, proud of all that work you’re sharing by pictures too.
As you move forward I strongly recommend you use larger wheels and raise the body up some. I must admit that I do like the low rider look and of course you can’t compromise that look with safety however I really don’t think the wheels you have on it now can handle the speed for very long but will admit that parallel parking would be easy with the current configuration but I digress. I think you may have to reconfigure the steering set up, not totally sure but could be possible.
Keep sending us updates, tongue in cheek John
Re: Delivery Car Project Build
Posted: Sat Aug 12, 2023 11:15 pm
by Tbird
JTT3 wrote: ↑Sat Aug 12, 2023 1:32 pm
Mike, really a nice build you have going on, proud of all that work you’re sharing by pictures too.
As you move forward I strongly recommend you use larger wheels and raise the body up some. I must admit that I do like the low rider look and of course you can’t compromise that look with safety however I really don’t think the wheels you have on it now can handle the speed for very long but will admit that parallel parking would be easy with the current configuration but I digress. I think you may have to reconfigure the steering set up, not totally sure but could be possible.
Keep sending us updates, tongue in cheek John
Noted! HA HA HA
Re: Delivery Car Project Build
Posted: Mon Aug 28, 2023 7:28 pm
by Tbird
Got the “C” sections done. My daughter wanted to lend “dusty ol dad” a hand along with a neighborhood boy who was intrigued with what I was building in the garage. I asked his parents if he could come over for a little bit if he wanted to help. He was pretty excited to help do some sanding.
Re: Delivery Car Project Build
Posted: Mon Aug 28, 2023 7:28 pm
by Tbird
Re: Delivery Car Project Build
Posted: Tue Aug 29, 2023 8:11 am
by Aussie16
Its going to be a pity to cover all that beautiful timber work up. Great progress.
Re: Delivery Car Project Build
Posted: Tue Aug 29, 2023 8:38 am
by Arbs
Beautiful work. Kudos for accomplishing that in your 2 car garage.
Re: Delivery Car Project Build
Posted: Wed Aug 30, 2023 4:25 pm
by Tbird
Aussie16 wrote: ↑Tue Aug 29, 2023 8:11 am
Its going to be a pity to cover all that beautiful timber work up. Great progress.
Thankfully the inside framework will still be visible
Thanks!
Re: Delivery Car Project Build
Posted: Wed Aug 30, 2023 4:26 pm
by Tbird
Arbs wrote: ↑Tue Aug 29, 2023 8:38 am
Beautiful work. Kudos for accomplishing that in your 2 car garage.
Thanks! My wife kinda frowned on it when I first started framing it up, but now she’s really excited to see it finished!

