Page 1 of 1
DIY Coil Rebuilding
Posted: Tue May 16, 2023 10:17 am
by Tom Dove Jr
Being the glutton for punishment I am, the question of rebuilding my own wood spoke wheels has been asked and answered during the "collect parts for the restoration" process. I've got the drawings to build my own jig thanks to some of the folks on this forum. What about the coils?
Neither of the cars I'm starting with had coils or any of the associated boxes, etc. Is there a particular year of manufacture or model I should be keeping my eyes open for? Both of my cars are 1925.
It is apparent that a "bona fide" coil testing machine is needed for final adjustment, but what about the overall rebuild process? Many parts are available from the usual suppliers so that implies that many folks already do this. There are videos on YT but the names of the "posters" are not familiar to me.
I've looked here on the Forum but not really seen the "process".
Thanks!
Tom
=====
Re: DIY Coil Rebuilding
Posted: Tue May 16, 2023 11:25 am
by Been Here Before
"" It is apparent that a "bona fide" coil testing machine is needed for final adjustment, but what about the overall rebuild process?""
I know that I am in the minority here, coils can be "averaged-in" with out a HCCT or microchip bitbox.
Following the advice found in period manuals and articles, as long as the current draw is with in specs and the points are set at proper alignment, and that the cushion spring is in order, the coils will do what they are designed to do.
Contradictory to modern perception the Model T Ford and its ignition system has no need to be spot on.
Re: DIY Coil Rebuilding
Posted: Tue May 16, 2023 11:49 am
by Moxie26
Tom.. good luck with "been here before" suggestion on coil rebuilding and calibration. .....There is a plethora of videos on YouTube on coil rebuilding using technique and settings to fire.. some work and some don't..... Is there something really wrong with using something to properly set coil output and performance? .......Coil electrical settings are important for ease of starting and engine performance. Only you could make up a best decision of what's good for you to drive your Model T. After a while traveling in your Model T, you will question if you can get more out of your coils, and you will progress to use the ECCT coil setting procedure . Been there, done that ! ,......... As far as coil rebuilding videos, the Model T Club of America has videos on " You Tube" listed on how to rebuild and calibrate. You Tube also has video on how to calibrate using the ECCT system. Good luck, there's a lot to learn to rebuild the correct way, using correct parts and electronic meters and tools.
Re: DIY Coil Rebuilding
Posted: Tue May 16, 2023 1:34 pm
by Tom Dove Jr
Appreciate the replies! I'll be looking for those YT vids.
I'm an "in for a penny, in for a pound" guy so learning how to do these things in the manner of the 1920s Model T owner is what I'm after.
Thanks!!
Tom
=====
Re: DIY Coil Rebuilding
Posted: Tue May 16, 2023 3:51 pm
by Moxie26
Tom.... There are quite a few Model T'ers in California that own the ECCT coil systems. If you belong to a chapter, it wouldn't hurt to ask around who can be of help when you're ready.
Re: DIY Coil Rebuilding
Posted: Tue May 16, 2023 3:53 pm
by MKossor
Contradictory to modern perception the Model T Ford and its ignition system has no need to be spot on.
.......
learning how to do these things in the manner of the 1920s Model T owner is what I'm after.
........
Yes, it's relatively easy to get a Model T engine to "Run" with coils tuned by ear. It just wouldn't run very smoothly or reach much over 1300 RPM, surging and jerking along down the road. No, thats not how a Model T is supposed to run.
There is a huge difference between a Model T engine that "Runs" and one that runs well. Properly maintained coil points that are tuned for equal and consistent firing Time by actually measuring coil dwell time to fire spark is an essential requirement of enjoying a Model T engine that runs well. Sadly, many have never experienced the difference and have no idea how well a Model T can run.
Re: DIY Coil Rebuilding
Posted: Tue May 16, 2023 3:59 pm
by Scott_Conger
Contradictory to modern perception the Model T Ford and its ignition system has no need to be spot on.
...actively setting the hobby back 60 years - one post at a time...
since the advent of multi-cylinder cars, inventors have tried to make ignition systems "spot on" for over 100 years. From master coils, to improved coil design to improved testing apparatus and methodology.
the only benefit from having a T run so poorly from not being "spot on" is that one will likely not ever get close enough to fall off the edge of the earth.
Re: DIY Coil Rebuilding
Posted: Tue May 16, 2023 4:10 pm
by A Whiteman
Go for it Tom - I did. I didn't have the fancy stuff either, and guess what! My car still ran* and kept up with any other club cars.
Have a go - its is not really that hard to do, the adjustment (despite the technical views otherwise) can be done. Maybe not 'perfectly' but enough to get you going.....
(* Later I had my coils checked and adjusted 'properly', but honestly, I hardly noticed any major performance change. Maybe I am just a slow learner.)
Re: DIY Coil Rebuilding
Posted: Tue May 16, 2023 5:01 pm
by Luke
A Whiteman wrote: ↑Tue May 16, 2023 4:10 pm
...
(* Later I had my coils checked and adjusted 'properly', but honestly, I hardly noticed any major performance change. Maybe I am just a slow learner.)
Given the coils you supplied for adjustment I'm not surprised there wasn't a lot of difference! Most of them were so stuffed it was impossible to get them close to being right, even with a decent electronic tester. Methinks your chooks must have been using them as building blocks or something

Re: DIY Coil Rebuilding
Posted: Tue May 16, 2023 5:15 pm
by tdump
When it comes to Model T's I have done so much myself, but I tried redoing some coils and I can make 1 buzz and I can get get 1.2 amps or thereabouts. But Coils and gas tanks are 2 things I finally decided to bite the bullet on.New gas tank and Ron the Coil man are the 2 things I splurge on. Especially after the experience I had in 2007 or 08 when I was messing with a 27 touring and I had already started it and loaded it on the trailer,and the set of Ron patterson coils came by brown truck. We swapped the coils and seriously, it was like trading for a new car,the difference it made in the way that car ran
Nothing wrong with learning the process, we may 1 day loose the ability to mail stuff off and get them fixed, who knows.
Re: DIY Coil Rebuilding
Posted: Tue May 16, 2023 5:31 pm
by Distagon2
"There is a huge difference between a Model T engine that "Runs" and one that runs well. Properly maintained coil points that are tuned for equal and consistent firing Time by actually measuring coil dwell time to fire spark is an essential requirement of enjoying a Model T engine that runs well. Sadly, many have never experienced the difference and have no idea how well a Model T can run."
Truer words were never spoken....at least not in the Model T world.
Re: DIY Coil Rebuilding
Posted: Tue May 16, 2023 10:34 pm
by Tom Dove Jr
Thank you to all for the input!
I’ve not yet begun to tap into my local resources as there are a number of things being cleared out of my garage. My 66th birthday is August 1st and that is my target date to begin this rebuild/restore/thing.
Tom
=====
Re: DIY Coil Rebuilding
Posted: Wed May 17, 2023 5:27 am
by A Whiteman
Given the coils you supplied for adjustment I'm not surprised there wasn't a lot of difference!
SSHHHH don't tell them all the laundry

Re: DIY Coil Rebuilding
Posted: Wed May 17, 2023 7:01 am
by Charlie B in N.J.
As a former buzz box proponent I can tell you for a fact that by ear and almost there is a load of bunk. The first time I had my home rebuilt coils properly set up was unbelievable. The car started cold with the hand crank on mag for the first time since I owned it. The performance was a major improvement also. Don’t let anyone talk you out of it because it’s a must do.
Re: DIY Coil Rebuilding
Posted: Wed May 17, 2023 8:46 am
by Been Here Before
"As a former buzz box proponent I can tell you for a fact that by ear and almost there is a load of bunk."
Interesting. I posted an article from 1900 discussing the manufactures response to adjusting of trembler coils. The manufactures of the period state that coils should not be set by ear. Proper points setting and current draw was to order of the day..
Re: DIY Coil Rebuilding
Posted: Wed May 17, 2023 3:28 pm
by Tom Dove Jr
My goal is to get all running as well as possibly can be done using the technology of the day. I'm not so much an historical stalwart as just learning to do it to the best of my ability. From there, likely date appropriate upgrades and modifications.
Tom
=====
Re: DIY Coil Rebuilding
Posted: Wed May 17, 2023 3:56 pm
by Scott_Conger
then you need to find someone that owns a HCCT (as well as learn to solder using a blowtorch and a hunk of copper hanging from a handle!)
Re: DIY Coil Rebuilding
Posted: Wed May 17, 2023 4:04 pm
by Art M
I am a buzz box user, but with lots of electronic equipment connected to it. I plan to compare the performance of coils set with my method(s) to coils set with an ECCT. Also I want to see how far off my method gives compared to ECCT specifications.
This exercise is entertainment to me.
Re: DIY Coil Rebuilding
Posted: Wed May 17, 2023 4:32 pm
by Moxie26
Don't get confused with the HCCT results compared to the ECCT results.. the ECCT will have each coil fire at the same precise moment in the cycle, the HCCT will not. ........HCCT results depends not only on 1.3 amp reading with single sparking, but a operator guesswork level of the start of tester sparking that would imho dwell time of that coil unit .... And to get four to fire equally at a precise moment on an hcct imho is next to impossible. ...... Years years ago a good friend asked me to check his coils using my hcct. Turns out these were new coils made with new wood coil boxes and recycled internals made by Mr Regan's company. Initial point Gap was very excessive an amperage draw was over 1.6 amp. Adjusted cushion spring travel, gapped points at Ford specified starting gap, and adjusted lower vibrator to 1.3 average. Engine started on second pull using the magneto. This was my experience with Regan's coils set up on Regan's electronic coil tester which did not have the same results as a hand crank coil tester... And even more important did not give good results to the Model T owner as specified in sales catalog.
Re: DIY Coil Rebuilding
Posted: Wed May 17, 2023 4:35 pm
by Scott_Conger
I think the point is that the Tom is desiring to see what can be done with 1920's tech, not 2020's tech. A HCCT is 1920's tech.
no one is arguing the point of HCCT vs ECCT
Re: DIY Coil Rebuilding
Posted: Wed May 17, 2023 5:00 pm
by Been Here Before
"I think the point is that the Tom is desiring to see what can be done with 1920's tech, not 2020's tech."
Of all the HCCT still operational and those home brew, which is the most accurate for coils setting and testing. There has to be a flaw in a few of them. They can't all be perfect.
Re: DIY Coil Rebuilding
Posted: Wed May 17, 2023 5:23 pm
by Scott_Conger
if the meter(s) are calibrated, magnets are sufficiently charged, and the unit functions, then it functions. They all operate exactly the same way. Good, better, best is merely the opinion of the user based on preferences unrelated to the basic design (one meter vs two, motorized vs hand driven, etc).
the balance of the quality of coil performance attained is entirely in the hands of the operator
Re: DIY Coil Rebuilding
Posted: Wed May 17, 2023 8:35 pm
by MKossor
the balance of the quality of coil performance attained is entirely in the hands of the operator
Well, that sums up use of the HCCT vintage technology very well. I will add the behavior of coil dwell time to fire also differs with the abnormally slow magneto voltage rise time and abnormally low voltage produced when the HCCT is hand cranked. Add in the inability to detect point arcing due to slowly opening points that delayi/retard spark but still add to the average coil current draw also obscure the relationship between average coil current and time to fire spark.
Here is a simpler annology that acknowledges equally valid methods of measuring time.
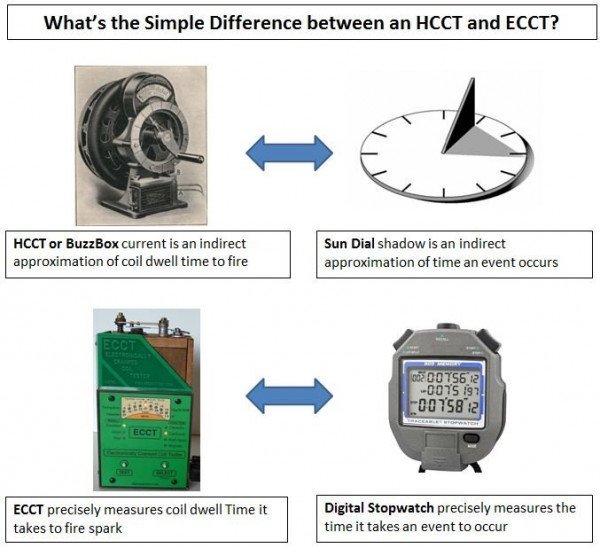
- ECCT vs HCCT Analogy.JPG-1.jpg (55.71 KiB) Viewed 6936 times
That said, It's actually very impressive the HCCT method works as well as it does. If you have one and are satisfied with the level of engune performance that results, you are all set. One has to also remember coil tuning is only one variable in the chain of variables necessary to enjoy optimal model T engine performance. An improperly centered timer cover or defective timer, for example, can inflict cylinder to cylinder timing variation that can severly limit engine performance UNLESS effects are cancelled by coils with unequal dwell times to fire spark. A quick check for this is changing coil positions in the coil box and engine performance degrades. That will not happen with a set of coils that are tuned for equal and consistent firing Time with all other variables in proper working order.
Re: DIY Coil Rebuilding
Posted: Thu May 18, 2023 9:10 am
by speedytinc
since you brought it up Mike K.
How much cylinder firing error is exceptable/not noticeable? one degree? 3,4,6?
How much error till performance is noticeable?
Timing error, I believe, comes from 4 potential areas.
1) Timer cover position. Mathematically, I figure 2 degrees +/- max @ the crank.
[Timer effect. 3" X 3.1415/360 = .026"/degree @ cam.
I Dont think you could get the cover off center more than about 1 degree worth]
Not a big deal unless you are running a roller timer & getting roller bounce in addition.
2) Timer construction error. I find 2 degrees +/- in some/a few (old) new day timers
3) Of coarse, coil firing time Up to +/-4 degrees X 2. =8 degrees. more commonly find +/- 2 degrees X 2 in HCCT tuned coils.
4) To a lesser degree of possibility, loose timing gear mesh. Maybe 2 degrees.
I noticed a roughly 10% speed increase going from HCCT tuned coils to ECCT tuned units, smoother running & a lower attainable idle speed.
I repeat my question.
How much cylinder firing error is exceptable/not noticeable? one degree? 3,4,6?
How much error till performance is noticeable?
Re: DIY Coil Rebuilding
Posted: Thu May 18, 2023 9:55 am
by Tom Dove Jr
I can see a passionate topic here, and my apologies for "stirring the pot" inadvertantly.
In my time spent with older cars ... defined as pre-1957 ... I am constantly amazed at the ingenuity, engineering, and thinking of the automotive industry. These people drove the technology to streamline what was being done VERY manually. INCREDIBLE!
As of late, it is so easy to believe technology drove innovation but those in this hobby have seen that is not the case. These early designers and engineers were brilliant AND they kept it simple enough that professional and backyard mechanics could maintain these cars without too much getting in the way.
With all we've learned in the last 100 or so years we can squeeze out an additional, what, 10% in performance on otherwisw stock equipment is to congratulate our predessessors.
VERY respectfully,
Tom
=====
Re: DIY Coil Rebuilding
Posted: Thu May 18, 2023 10:22 am
by Moxie26
Speedytinc .,... When you give attention and fix all six items you outlined, does that make your 4 coils fire at equal electrical dwell times ???? .... I

doubt it !!!!
Re: DIY Coil Rebuilding
Posted: Thu May 18, 2023 10:56 am
by Jerry VanOoteghem
Moxie26 wrote: ↑Wed May 17, 2023 4:32 pm
Turns out these were new coils made with new wood coil boxes and recycled internals made by Mr Regan's company. This was my experience with Regan's coils set up on Regan's electronic coil tester which did not have the same results as a hand crank coil tester... And even more important did not give good results to the Model T owner as specified in sales catalog.
Worship whatever coil god you wish, but please do not denigrate John Regan or his efforts. What was available before the Strobo-Spark unit? A $750, 250 lb., hand cranked piece of bench decoration? If somebody ultimately invented something that improved upon John's products, then that's fine, but recall that John advanced the hobby greatly with his offerings, many of which folks still greatly desire, but can no longer purchase.
Re: DIY Coil Rebuilding
Posted: Thu May 18, 2023 10:59 am
by Moxie26
Jerry.. I'm sorry if the truth hurts. ...... Reread my post that you partially copied leaving out what I found on adjustments before my attention.
Re: DIY Coil Rebuilding
Posted: Thu May 18, 2023 11:55 am
by speedytinc
Moxie26 wrote: ↑Thu May 18, 2023 10:22 am
Speedytinc .,... When you give attention and fix all six items you outlined, does that make your 4 coils fire at equal electrical dwell times ???? .... I
doubt it !!!!
There are 4 things. One of which includes all 4 coils in perfect tune for same firing times.
Thats what the ECCT shows. One can/should tune to +/- 0 firing time variation.
Coils are the area of most possible error, but the easiest to get all firing @ the same time with currently available equipment.
Even, exact firing start times can be tested in a stationary fashion of the effect of the other 3 items. Simply with noting/documenting where coil buzz starts for each cylinder with the hand crank reference & a cardboard background.
With an anderson timer & a little tweeking, firing error can be reduced to ZERO.
Re: DIY Coil Rebuilding
Posted: Thu May 18, 2023 11:56 am
by Jerry VanOoteghem
Tom,
I apologize for further contributing to this unfortunate thread drift. Please let us know more about your coil rebuilding progress, and above all, enjoy your T!
Re: DIY Coil Rebuilding
Posted: Thu May 18, 2023 12:38 pm
by MKossor
How much cylinder firing error is exceptable/not noticeable? one degree? 3,4,6?
How much error till performance is noticeable?
Top
Very clear and concise questions of high relevance to the discussion. Unfortunately, the answer sought is not always a clear and concise in my experience. There are many variables associated with engine performance than can influence and obscure the observability and determination of contributions of a single variable. I don't have data to quantity an answer.
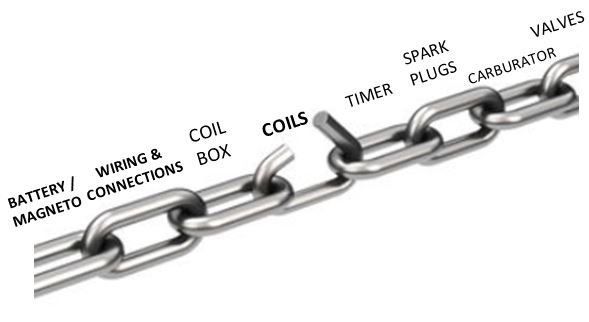
- Weak link in the chain.JPG (26.11 KiB) Viewed 6774 times
1) Timer cover position. Mathematically, I figure 2 degrees +/- max @ the crank.
[Timer effect. 3" X 3.1415/360 = .026"/degree @ cam.
I Dont think you could get the cover off center more than about 1 degree worth]
Not sure who created this visual but its useful to visualize the importance of timing cover alignment that imposes differing impacts to individual cylinder timing. Again, not at all supportive of linear thought.
And then there is the metrics for determining engine "performance". A dyno would be the preferred tool but not always readily available. I've tried real world road trials, even designed and mechanized my car with electronics for timed trials precisely timed with the opening of the throttle. Here is the article link:
https://img1.wsimg.com/blobby/go/f76807 ... 3345197823
Weather/wind/humidity are environmental variables that can skew and add uncertainty to the results so multiple runs using the same configuration are needed to differentiate between a particular configuration that differs more than the repeatability of the same configuration.
For example, need to plan a baseline (control) with properly adjusted coils with an Ideal Timer that does does not contribute any significant ignition timing variation. Then start introducing ignition timing variation between coils; coil 1 at 0deg, all others at +1, +2, +3, +4 deg. Then coils 1 and 2 at 0 deg and coils 3 and 4 at +1, +2, +3, +4 deg. Then a mix: coils 1 and 3 at 0 deg and coil 2 at -1, -2, -3, -4 deg and coil 4 at +1, +2, +3, +4 deg. I'd love run this experiment but very time consuming and just don't have the time right now. By all means experiment and report your results!
Re: DIY Coil Rebuilding
Posted: Thu May 18, 2023 1:39 pm
by speedytinc
Your off center timer diagram shows the timer off center by 1/8 ". That much is not possible, unless the inner timer contacts are way off center to the body also by a lot. (This could be possible with a very badly set anderson timer).
The timing cover only has enough bolt hole slop for a max of 1/32" possible off center, or less.
Hence my supposition/conclusion (with mathematical proof/justification) that the maximum effect on timing error, in reality could only be +/- 2 degrees max in crank travel. Thusly concluding, centering the timer isnt as big a deal as is made out to be.
Dont get me wrong, Getting firing time accuracy (0 deviation)is the goal & the cover centering still has a small role.
Or am I missing something?
Re: DIY Coil Rebuilding
Posted: Thu May 18, 2023 1:48 pm
by Moxie26
That diagram is possibly from a Fahnenstock article, indicating what a misaligned engine timing cover has on commutator centering.
Re: DIY Coil Rebuilding
Posted: Thu May 18, 2023 1:53 pm
by speedytinc
That could be, but is overly exaggerated.
Maybe to make the reader understand the "principle" easier.
Re: DIY Coil Rebuilding
Posted: Thu May 18, 2023 11:08 pm
by DHort
I think Tom just needs 2 sets of coils. One set with an HCCT and one set with an ECCT. That should be enough to satisfy his curiosity. This way he can play with one set and have a set that he knows is set as well as can be with modern technology.
Re: DIY Coil Rebuilding
Posted: Thu May 18, 2023 11:44 pm
by SurfCityGene
So Johnny, your 5/18 6:18 post where you said the ecct adjusted coils had a 10% increase in speed was that a seat in the Pants observation? That's pretty amazing if that was the only variable?
I thought there might also be some more offset in the cam bearing?
Re: DIY Coil Rebuilding
Posted: Fri May 19, 2023 8:35 am
by speedytinc
SurfCityGene wrote: ↑Thu May 18, 2023 11:44 pm
So Johnny, your 5/18 6:18 post where you said the ecct adjusted coils had a 10% increase in speed was that a seat in the Pants observation? That's pretty amazing if that was the only variable?
I thought there might also be some more offset in the cam bearing?
That performance increase was measured in before & after observations with GPS speed readings. There was/is a noticeable increase in acceleration, smoother running & ability to lower the running idle speed. The last 3 were "seat of the pants observation" I can attribute the increase specifically to the coil tune because It was the only new factor introduced in the test. The timer cover was perfectly centered & the timer(new day) was blueprinted to fire with no deviation between cylinders.
As far as timing cover off center. You will confirm with your current new motor build, the mounting holes are not much larger than the 3/8 mounting bolts. When you check with a centering gauge, its off in thousands of an inch, not fractions of an inch. My observation is the variation is typically no more than .010" , which calculates to about .3 degrees @ the timer which = .6 degrees @ piston travel. Quite negligible. But in the pursuit of perfection, worth adjusting to 0.
Re: DIY Coil Rebuilding
Posted: Fri May 19, 2023 9:31 am
by Moxie26
Hey Surf City Gene.. I just got up and pouring my coffee but I can't figure out who the hell Johnny is.. can you elaborate?..... Maybe I'm in the same class as Johnny 'cause I too notice a increased positive difference in the ECCT adjusted coils by the seat of my pants COMPARED TO THE TRADITIONAL HAND CRANK COIL TESTER CALIBRATED COILS.
Re: DIY Coil Rebuilding
Posted: Fri May 19, 2023 10:38 am
by Been Here Before
With all this discussion about the better way to tune a trembler coil for performance - ear, "buzz box," electronic HCCT, manual HCCT. There needs to be a showdown as to the best. I guess a drag race is in order.
https://www.autoevolution.com/
Re: DIY Coil Rebuilding
Posted: Fri May 19, 2023 10:45 am
by Moxie26
You got it George, great idea! ... Now we'll all meet at your house, you set the date and time and tell us what's for lunch!...

LOL. !!!!!!!
Re: DIY Coil Rebuilding
Posted: Fri May 19, 2023 11:03 am
by Been Here Before
""....you set the date and time and tell us what's for lunch!...""
As I am of the buzz box group -- a minority with the Forum and with ideas that may set it back 60 years...., I have to inform the group my schedule is full until hell freezes over.
I will be available briefly at the end of the day hell thaws.
Re: DIY Coil Rebuilding
Posted: Fri May 19, 2023 11:25 am
by Moxie26
George, you're not in the minority you're one of us on the Forum and your views and posts are appreciated ... Don't have to wait for hell to freeze over.
Re: DIY Coil Rebuilding
Posted: Fri May 19, 2023 11:27 am
by speedytinc
Been Here Before wrote: ↑Fri May 19, 2023 10:38 am
With all this discussion about the better way to tune a trembler coil for performance - ear, "buss box," electronic HCCT, manual HCCT. There needs to be a showdown as to the best. I guess a drag race is in order.
these-fire-spitting-ford-model-ts-are-what-no-nonsense-racing-is-all-about_5.jpg
https://www.autoevolution.com/
It would be simple enough to run a test on 3 separate coil type tune methods using the SAME T.
Time to climb a hill, maximum speed, glass of water on a fender for a vibration test.
This would be fun & informative.
Re: DIY Coil Rebuilding
Posted: Fri May 19, 2023 11:32 am
by Moxie26
How about a safer test.. ease of starting , lower idle speed capability, and normal speed limit in town driving.
Re: DIY Coil Rebuilding
Posted: Fri May 19, 2023 11:53 am
by speedytinc
Moxie26 wrote: ↑Fri May 19, 2023 11:32 am
How about a safer test.. ease of starting , lower idle speed capability, and normal speed limit in town driving.
No, safety last I say
But yes, lets add your tests also.
They are all pertinent to a coil function performance test
Re: DIY Coil Rebuilding
Posted: Fri May 19, 2023 1:46 pm
by Moxie26
Good "old seat of the pants " results accepted

????? LOL. !!¡!
Re: DIY Coil Rebuilding
Posted: Fri May 19, 2023 2:27 pm
by dykker5502
MKossor wrote: ↑Thu May 18, 2023 12:38 pm
Not sure who created this visual but its useful to visualize the importance of timing cover alignment that imposes differing impacts to individual cylinder timing. Again, not at all supportive of linear thought.
Effect of timing cover misalignment.jpg
Don't get me wrong - the timer must be seated properly and centered for several reasons, but when driving on the magnets, the time for the spark is not set by the timer, but by the magnets and the coilring. The 16 sparks comes at 16 different angles of the crank. The timer just select which of the 16 sparks that are used. If the timer is a little unprecise for whatever reason you may have some border situations where say 3 of the sparks are at one angle and the last is 360/16 = 22,5 degrees before or after. Moving the timer just a little bit will solve that.
As I understand it, there are a couple of reasons why a model T runs better on "MAG" than on (6V) "BAT":
1) the voltage increase with RPMs ensuring the coil is saturated faster as the engine runs faster = better spark at higer RPM's.
2) the sparks comes at a fixed and steady point in time (and 1) may advance the timing slightly??).
Combined with coils with consistand dwell, make the engine spinn as a kitten.
 doubt it !!!!
 LOL. !!!!!!!
 ????? LOL. !!¡!