Page 1 of 1
Radiator mounting, can't do it or I don't know what I'm doing
Posted: Sun Jun 04, 2023 5:02 pm
by bmklawt
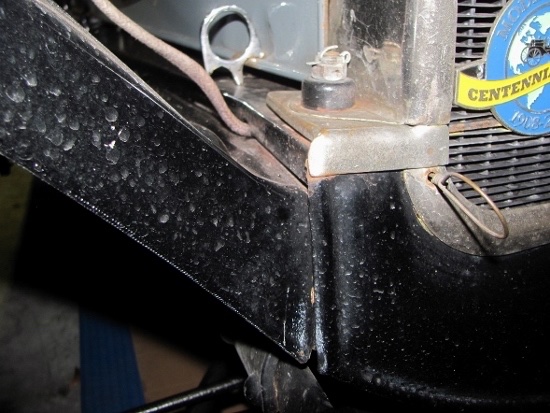
1927 Touring, I can not see a way to mount the radiator with the springs, without having the radiator mounted solid to the hood shelf. the picture shows where the mounting hardware would end up if the springs where fully collapsed, using new spring, which when collapsed are shorter than the originals.
The only thing I see different than all the drawing I have seen is the cotter pin hole is 3/16" from the end of the stud not 1/8" as shown in the diagram.
What am I missing.
Re: Radiator mounting, can't do it or I don't know what I'm doing
Posted: Sun Jun 04, 2023 5:15 pm
by Humblej
The springs should not be fully compressed during installation. The stud does apear to be short and the wood block to be a bit thick.
Re: Radiator mounting, can't do it or I don't know what I'm doing
Posted: Sun Jun 04, 2023 7:24 pm
by Scott_Conger
Bruce
I think your wood blocks are probably too thick
and for the life of me, that sure looks like a stack of washers and not a spring - is that just a mock-up?
and yes, the radiator should essentially sit on the radiator apron and hood shelf
I see room for everything once the wood blocks lose maybe 1/16" or 1/8"
Re: Radiator mounting, can't do it or I don't know what I'm doing
Posted: Sun Jun 04, 2023 7:39 pm
by nicklm
i think there are two lengths of studs that are used for the installation. You should check that you have the right length as well as the spring measurements too.
Re: Radiator mounting, can't do it or I don't know what I'm doing
Posted: Sun Jun 04, 2023 7:42 pm
by TRDxB2
Can't see the the radiator or shell. Would a smaller stud work if the new springs are shorter?
Re: Radiator mounting, can't do it or I don't know what I'm doing
Posted: Sun Jun 04, 2023 7:59 pm
by Will_Vanderburg
From what I see in the parts books, the stud comes in two different lengths.
Also, one spring goes on the bottom of the stud and the other goes on top of the frame
Re: Radiator mounting, can't do it or I don't know what I'm doing
Posted: Sun Jun 04, 2023 8:40 pm
by bmklawt
Yes this is just a mock up, that is a stack of washers that measure .520 a collapsed spring measures .570, a collapsed spring would fit inside the lower thimble so I left that out for the mock up.
The thickness of the radiator mounting flange and shell measure 3/8", my research tells me the correct stud for a 1927 is 3-1/2" long which I have and looking at the mock up there is not enough length on the stud to add the radiator.
It's quit possible I have the wrong hardware, radiator and/or shell, I am also having problems with the hood fitting correctly, see
https://www.mtfca.com/phpBB3/viewtopic. ... 82#p273782 which makes me think something is wrong with this set up.
How thick should the hood shelf be?
Re: Radiator mounting, can't do it or I don't know what I'm doing
Posted: Sun Jun 04, 2023 9:05 pm
by Allan
The springs should not be crushed. They are there to allow movement at the frame so wracking does not wreck the radiator.
The upper spring has the top hat thimble fitted over it. The radiator sits on the flange of the thimble, and so it "floats " on the spring. It is not intended to be bolted down firmly.
Hope this helps.
Allan from down under.
Re: Radiator mounting, can't do it or I don't know what I'm doing
Posted: Sun Jun 04, 2023 9:21 pm
by DanTreace
Your mount should be ok with that 3 1/2" long stud, that is long for the '26-27 as the rad and shell fit over the hood shelf.
Only a few times I have 'shortened' the repro spring for the top of the rad on a grinder to help the overall compression of the system. You may have to do one spring that way.
The wood block can sit a bit up on the frame, however flush is best, but be sure the hood shelfs are seated well. Too high blocks or shifted can interfere.
Also be sure to fit the long nut plate to just engage the stud, so that fitting the cotter, and then twisting the stud up, gives maximum length to the stud. On install, use a tool to compress the lower spring to lift up the stud and have plenty of thread up above the rad for engaging the castle nut. On the earlier stud nuts they are short and can twist, so a screwdriver there can help, but also use a screwdriver to place under the nut to lift the stud up.
- 26 27.jpg (100.06 KiB) Viewed 4620 times
- IMG_2724 (600x450) (590x443).jpg (138.66 KiB) Viewed 4620 times
Re: Radiator mounting, can't do it or I don't know what I'm doing
Posted: Sun Jun 04, 2023 10:52 pm
by TXGOAT2
You absolutely do NOT want the radiator bolted tight to the frame.
Re: Radiator mounting, can't do it or I don't know what I'm doing
Posted: Tue Jun 06, 2023 12:48 pm
by Mikey1968
When I went through this process, I had read on here that the new shelf blocks are too thick and must be sanded down. I had to get new shelves and blocks as a prior owner used the old shorter stud kit and cut the end of the blocks and shelves off! Needless to say, the lower skirt where the crank goes through did not fit. Being new to Ts, it took some digging to find out what was wrong. So along with the new radiator, I now had to get new mounting kit, skirt, blocks and shelves. While this far into it, I pressed out the crank bushing and put in a new one using a grade 8 bolt and two sockets. Can add pics if asked.
With all this apart, I added the aluminum pulleys, new timer, new belt, eliminated the water pump, new crank ratchet and spring pin, etc.
In for a penny, in for a pound!
Cheers,
Mike
Re: Radiator mounting, can't do it or I don't know what I'm doing
Posted: Fri Jun 09, 2023 6:49 pm
by bmklawt
I sanded the wood shelf blocks down to 1/2" from 5/8" thick, I filed all the solder boogers off the flange, I can get the radiator mounted now but believe it is still to tight. Most pictures I can get a close enough view of, it looks like the flange is about 1/8" thick and sits about an 1/8" off the frame, my radiator flange is .300 thick and the flange sits on the frame with the nuts just tight enough to get the cotter pins in.
What are your thoughts, this is my first Model T and I don't know how it should be, I would think if the radiator was mounted correctly there would be at least a minimum of an 1/8" compression left in the springs.
Re: Radiator mounting, can't do it or I don't know what I'm doing
Posted: Fri Jun 09, 2023 7:06 pm
by speedytinc
Not sure, but the diaper should be just under the shell. There should be no gap in the trim. If that misaligns your crank handle, your diaper may be for 24-25.(They are different than 26-7) The diaper has a poorly defined bead. Tells me repop.
Re: Radiator mounting, can't do it or I don't know what I'm doing
Posted: Fri Jun 09, 2023 7:48 pm
by Will_Vanderburg
You’ve got something mounted wrong. The radiator mounting ears should NOT touch the frame. If it does, the ability to flex is gone.
After the stud protrudes through the frame, put a spring on the stud. Then add the cup with the lip, then the radiator and shroud. Then add the remaining cup and run down the castle nut until a slot aligns with the hole in the stud and no further.
Re: Radiator mounting, can't do it or I don't know what I'm doing
Posted: Fri Jun 09, 2023 7:49 pm
by Scott_Conger
You're not far from getting it...
one thing you're missing now that you've shown this view, are the little trim pieces which rivet to the end/bottom of the shell: 3947LB & 3947RB
For info:
https://www.modeltford.com/item/3947LB.aspx
with these missing, it makes it look like there is an unplanned gap in the trim (because there is) and this is what John's alluding to.
Finally, I am wondering if your shell isn't a repro as indicated by the color of the plating and the pop rivets holding the hood retainer (name?). While I don't think this is adding to your trouble, it is just perhaps something worthy of looking into after you solve the fit issue.
Re: Radiator mounting, can't do it or I don't know what I'm doing
Posted: Fri Jun 09, 2023 8:58 pm
by Allan
The only repop radiator shells I know of were steel. They did not have the sides splayed outwards on the high shells, so they never could fit properly. Going on the well formed ridge around the filler neck hole, yours is not one of those.
.You do still have a problem though, Scott's reference to pop rivets alerting me to it. The hinge rod receiver held on by those rivets must be the open U shaped one. If the cowl end is standard, you will not be able to fir the hood between two closed receivers.
Allan from down under.
Re: Radiator mounting, can't do it or I don't know what I'm doing
Posted: Fri Jun 09, 2023 10:50 pm
by bmklawt
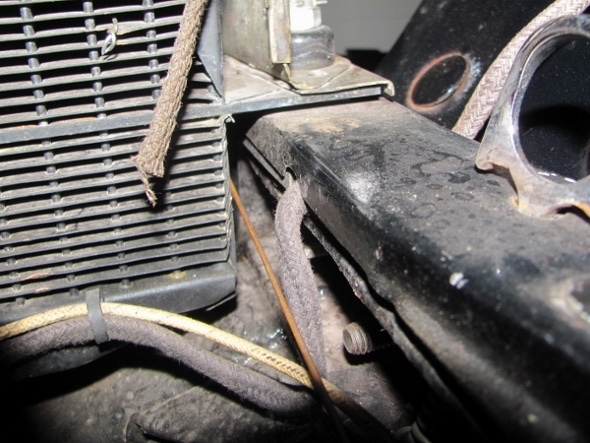
My Radiator shell is steel, what does a 1927 radiator apron look like, mine has slots in that will only big enough to fit over the radiator mounting stud not over the thimble.
There is a spring under the frame and one under the thimble, there is just not enough length in the studs to back he castle nuts off and still get the cotter pin in.
According to the drawing the radiator stud should be 3-1/2" long with the center of the cotter pin holes 1/8" from the end, the ones I received from Lang's have the hole 3/16" from the end, I would gain an 1/8" if they were correct.
I'm going to make my own studs, how far off the hood shelf should the radiator flange be when set up correctly?
Re: Radiator mounting, can't do it or I don't know what I'm doing
Posted: Sat Jun 10, 2023 1:19 am
by TRDxB2
What is that layer between the radiator leg & the apron
Re: Radiator mounting, can't do it or I don't know what I'm doing
Posted: Sat Jun 10, 2023 9:08 am
by Scott_Conger
how far off the hood shelf should the radiator flange be when set up correctly?
Once you fit the missing parts to your shell that I listed, they will dictate where/how things should be mounted (as well as hood fit will)
Now, if your shell has slots and will not allow the thimble to fit through, then you're dealing with a repro shell as well.
Re: Radiator mounting, can't do it or I don't know what I'm doing
Posted: Sat Jun 10, 2023 9:47 am
by jiminbartow
Here is a drawing of the order of assembly for the 1926-‘27 front end. Hard to believe, but the springs will fit. Just run out the nuts on the study’s far as they will go and use clamps and wedges and wood spacers to compress the springs. Once on, you can tighten the nuts and insert the cotter pins. Jim Patrick
Re: Radiator mounting, can't do it or I don't know what I'm doing
Posted: Sat Jun 10, 2023 11:39 am
by bmklawt
I would argue I do have this correct per the drawing, most radiators I have seen look like the mounting flange is a single thickness, on mine the top and bottom sides of the radiator are bent at right angles and soldered to the flange making the flange 3 thickness of metal, if that makes any sense at all, so to answer Frank's question "what is this" it's the lower side of the radiator.
Re: Radiator mounting, can't do it or I don't know what I'm doing
Posted: Sat Jun 10, 2023 12:22 pm
by Scott_Conger
I don't think anyone is saying "you don't have it right". You just don't have ALL of it and that is why your radiator supports are exposed...you're still missing trim pieces.
Additionally, if the thimble cannot come "up" through the upper shell and the shell has a slot (not a hole), then the shell is a repro
I think I've seen radiators with your extra lower support piece, and it may be normal for a 3 row radiator...just checked an old 3 row radiatior. It has two metal reinforced tabs but they are only about 3/16" thick total
you will do responders a favor by photographing "down" at the bare flange of the upper shell and also reporting if your radiator is flat-tube or round tube, and how many rows. That super thick flange just looks wrong and am wondering if you're not also fighting an old replacement core (the scalloped cooling fins don't look right either).
Re: Radiator mounting, can't do it or I don't know what I'm doing
Posted: Sat Jun 10, 2023 1:22 pm
by bmklawt
"Missing trim pieces" are we talking on the radiator shell? would that have any bearing on the radiator fit.
I'm totally guessing here, but it looks like and original radiator mounting flange is 1/8" thick, mine is .300" thick, so if I make a stud with the center of the cotter pin holes 3-7/16" center to center it should work, I think.
Re: Radiator mounting, can't do it or I don't know what I'm doing
Posted: Sat Jun 10, 2023 1:31 pm
by Scott_Conger
"Missing trim pieces"
take a look at your radiator shell
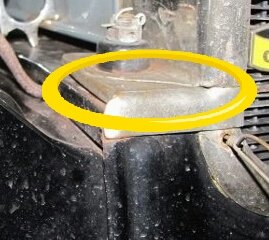
now take a look at the picture that Dan posted:

- 26 27.jpg (58.37 KiB) Viewed 4042 times
can you now see that your entire radiator flange is now covered? Look at the Lang's link I supplied. You will see these pieces.
as far as "fixing" things, there is absolutely no reason to believe that you have the correct springs, so personally I'd shorten them a tad on a belt sander or go ahead and make "correct" studs. Either will accomplish the same thing.
then bore a hole on each "ear" of the shell so that it correctly fits OVER the thimble (which it cannot do with a "slot" as it is now), rivet on the missing trim parts.
Until you mock up all the correct parts and gauge where you need to "stop" with the compression to achieve a visually pleasing trim alignment (while maintaining some bounce on the springs), you will not really know how far apart your cotter pin holes should be (though I'll bet they will fall where the factory drawing says they should be)
Re: Radiator mounting, can't do it or I don't know what I'm doing
Posted: Sat Jun 10, 2023 2:29 pm
by Professor Fate
- 20230610_142558.jpg (20.93 KiB) Viewed 4001 times
This little trim piece between the radiator shell ear and the hood shelf is very important to proper fitment.
I think that's what Scott is referring to.
Re: Radiator mounting, can't do it or I don't know what I'm doing
Posted: Sat Jun 10, 2023 4:05 pm
by bmklawt
Gotcha, parts on order.
The radiator shell does fit over the thimble I was talking about the apron has slots.
The springs are only 1/8" taller and the bottom thimble.
I made new studs of the correct size, one side seems perfect the other is still to tight, I'll keep fiddling with it when I get the new parts.
Re: Radiator mounting, can't do it or I don't know what I'm doing
Posted: Sat Jun 10, 2023 4:53 pm
by TRDxB2
bmklawt wrote: ↑Sat Jun 10, 2023 1:22 pm
"Missing trim pieces" are we talking on the radiator shell? would that have any bearing on the radiator fit.
I'm totally guessing here, but it looks like and original radiator mounting flange is 1/8" thick, mine is .300" thick, so if I make a stud with the center of the cotter pin holes 3-7/16" center to center it should work, I think.
Longer is better (3-1/2") - shim it with a washer if necessary. & be done.
These are very thin
--
--
If I didn't think I needed these (3-1/2") they'd be in the mail to you, Cotter pin holes are off set 90degrees on the other end
Re: Radiator mounting, can't do it or I don't know what I'm doing
Posted: Sat Jun 10, 2023 5:53 pm
by nicklm
Note that the pic showing the screwdriver to hold the flat plate that the stud screws into has 4 or 5 layers of spring. Your spring seems to have 7 or 8 layers. Too much spring?
Re: Radiator mounting, can't do it or I don't know what I'm doing
Posted: Mon Jun 12, 2023 8:07 am
by Allan
Bruce, if the side panels and the bottom tank support panels that are bent and fixed to the cross bar in the radiator are in fact soldered to the cross bar, the spot welds which usually fix them to the bar have been broken and solder has been used as an easy fix. I had not noticed the flutes in the fins which Scott alluded to, so you may well have an aftermarket radiator, built differently to the standard Ford item, with the usual problems with fit that come with the use of spurious replacement parts. Longer studs may well be the answer.
Allan from down under.
Re: Radiator mounting, can't do it or I don't know what I'm doing
Posted: Mon Jun 12, 2023 2:35 pm
by Professor Fate
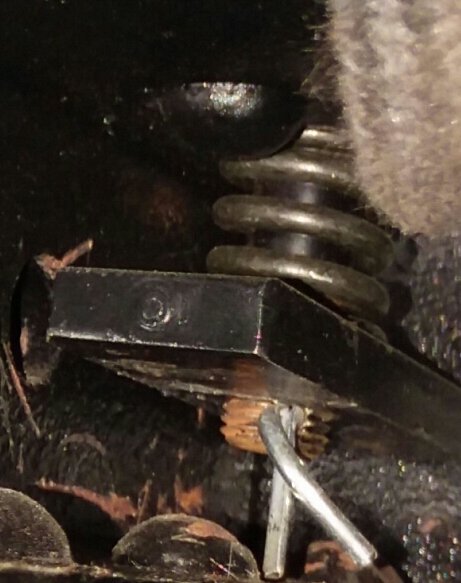
- 20230612_141724.jpg (45.8 KiB) Viewed 3846 times
I had to cut spring loops off the modern day kit springs to get them to fit and compress properly.
I used a pry bar to compress the spring on the bolt with the base plate screwed on.
Once you have the spring compressed with the pry bar, feed 2 inch shims made from paint stick in between the bolt and bottom channel of the frame. Remove the pry bar and allow the shims to hold everything in place.
Now you can begin to mock up the hood shelves, radiator, shell, and apron to make sure you have enuff threads showing to tighten it all up. Add shims if needed.
Springs I used were too long and not compressing appropriately for their length.
Once you tighten everything up, the wood shims should be free so you can pull them out.
Count your spring loops!
And, I'll be replacing the cotter pin pictured.