Page 1 of 1
Using composite Coil Box rebuild kit from Langs
Posted: Fri Jun 09, 2023 4:32 pm
by IanMacLeod
Good evening friends. We have a '15 T 3 door touring that I am rebuilding the box that holds the 4 coil boxes. I got the composite kit from langs. The 10 posts that screw in all have threads leading upto the squared head of the bolt. The composite back has predrilled round holes. With a wood back, I've been told that the pressure when tightening will have some give and the square bolt will ease into the round hole. Do I have to do anything special for the composite? drill hole bigger? Will tightening allow the squared head to "fit" into the round hole without modification? Should I use a blue torch to heat the hole(s) briefly to soften the edges to allow a tightening up? Help, suggestions, what did you do that works? Thanks! C
Re: Using composite Coil Box rebuild kit from Langs
Posted: Fri Jun 09, 2023 4:51 pm
by Scott_Conger
Chris
simply drawing the bolt in may possibly damage the porcelain tubes
use a small metal stump that fits into the recess and use it along with a vice or press. With the plastic fully supported around the outside, press the bolts home and they will force the plastic to flow and make a nice tight square hole. A small diameter deep-well socket is perfect for this as it will allow the bolt some place to go and will support the plastic very close to where it is being smooshed.
Take this opportunity NOW to sweat-solder your contacts to the underside of the head, allow to cool, clean flux off (use RMA mildly activated rosin flux, not acid!). Now you're ready to press things into place, using care to align the contacts before pressing.
Good solder flow:
Fiberglass tape to insulate wire from bottom of box (your wire will likely lay in a different slot, but for your sake, be sure to use the tape to avoid a future short):
FWIW, it was a good choice to chose the plastic kit over the wood kit. The increase in reliability far exceeds any perceived downside of using non-original materials...no one wants to be stranded in a downpour.
Welcome to the affliction!
Re: Using composite Coil Box rebuild kit from Langs
Posted: Fri Jun 09, 2023 4:56 pm
by Bill Anziani
When I did mine, I did not use any heat or re-drill any holes
The square end did suck into the composite and secures the bolts
Re: Using composite Coil Box rebuild kit from Langs
Posted: Fri Jun 09, 2023 5:49 pm
by speedytinc
If you can salvage the original contacts, do so.
The repop contacts are historically to soft.
They will loose their tension & cause contact grief in the future.
Clean em up real good and solder the bolt heads as recommended.
Re: Using composite Coil Box rebuild kit from Langs
Posted: Fri Jun 09, 2023 8:40 pm
by Moxie26
Reusing the original phosphor bronze coil box contacts is the best way to go electrically.
Re: Using composite Coil Box rebuild kit from Langs
Posted: Fri Jun 09, 2023 8:56 pm
by slang250
Phosphor bronze contacts are being reproduced that are just as good as the originals. They have the split bifurcated contacts as the originals as well with the correct spring temper to them.
John Regan started to make them 15 or so years ago to the original print and they can still be bought now.
The contacts that you have to stay away from are the copper ones.
There are still copper ones out there that do not have any spring tension to them and do not have the split bifurcated contact to them that are giving all of the reproduction contacts a bad name.
Re: Using composite Coil Box rebuild kit from Langs
Posted: Fri Jun 09, 2023 9:16 pm
by slang250
Also to answer the original poster I like to tap the bolts into the plastic with a hammer and punch and having the plastic supported on the backside by some sort of pipe or like Scott described a socket to keep the plastic from possibly breaking. Make sure to have the square of the bolt head line up with the square that is cut into the contacts.
Re: Using composite Coil Box rebuild kit from Langs
Posted: Fri Jun 09, 2023 10:35 pm
by speedytinc
slang250 wrote: ↑Fri Jun 09, 2023 8:56 pm
Phosphor bronze contacts are being reproduced that are just as good as the originals. They have the split bifurcated contacts as the originals as well with the correct spring temper to them.
John Regan started to make them 15 or so years ago to the original print and they can still be bought now.
The contacts that you have to stay away from are the copper ones.
There are still copper ones out there that do not have any spring tension to them and do not have the split bifurcated contact to them that are giving all of the reproduction contacts a bad name.
Thanks for the clarification.
Good to know there are good contacts available today.
Re: Using composite Coil Box rebuild kit from Langs
Posted: Sat Jun 10, 2023 1:09 am
by Allan
The kit is a really nice piece of work. I have fitted quite a few of them over the years. There is one area which can cause some frustration though. The slit in the bottom of the back panel that goes over the folded lip in the base of the case does not allow the panel sit as low as it might due to the radius of the bend in the sheet metal of the base. This results in the screw holes in the black panel not aligning with the holes in the tin case. I cut the bottom inside edge of the back panel back a bit so the outside edge can drop a little lower, and the screw holes will align.
Allan from down under.
Re: Using composite Coil Box rebuild kit from Langs
Posted: Sun Jun 11, 2023 8:38 am
by IanMacLeod
Thank you for all your help and photos in this little project. I have accomplished "squaring the holes" and will reattached them after a good cleaning this afternoon. I have another question regarding the soldering...I haven't done much of that, so please give me a little insight... I assume that I'll solder the heads etc, after installation of threaded rods onto the new composite back board & ive tightened them, right? Then I use the soldering iron to heat up the head & when it's hot enough , ill apply the solder around the head & it'll suck it in? then let cool? Thanks for your useful comments and help! Chris
Re: Using composite Coil Box rebuild kit from Langs
Posted: Sun Jun 11, 2023 8:41 am
by IanMacLeod
Scott_Conger wrote: ↑Fri Jun 09, 2023 4:51 pm
Scott, thank you! Do I do the soldering after I've reattached the bolts & insulators & tightened? Then heat head & apply solder to side & it'll suck the solder in? Thanks for your help. C
Chris
simply drawing the bolt in may possibly damage the porcelain tubes
use a small metal stump that fits into the recess and use it along with a vice or press. With the plastic fully supported around the outside, press the bolts home and they will force the plastic to flow and make a nice tight square hole. A small diameter deep-well socket is perfect for this as it will allow the bolt some place to go and will support the plastic very close to where it is being smooshed.
Take this opportunity NOW to sweat-solder your contacts to the underside of the head, allow to cool, clean flux off (use RMA mildly activated rosin flux, not acid!). Now you're ready to press things into place, using care to align the contacts before pressing.
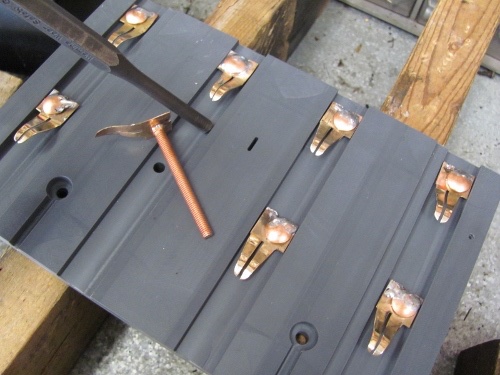
Good solder flow: P5170043.JPG
Fiberglass tape to insulate wire from bottom of box (your wire will likely lay in a different slot, but for your sake, be sure to use the tape to avoid a future short): P1290170.JPG
FWIW, it was a good choice to chose the plastic kit over the wood kit. The increase in reliability far exceeds any perceived downside of using non-original materials...no one wants to be stranded in a downpour.
Welcome to the affliction!
Re: Using composite Coil Box rebuild kit from Langs
Posted: Sun Jun 11, 2023 9:07 am
by Scott_Conger
Chris
don't solder the contacts after installation...the bolts will take enough heat that the plastic may go soft.
EVERYTHING MUST BE CLEANCLEANCLEAN!!!
drill a hole in a piece of wood to fit the bolt
flux and solder the underside of the bolt head then shake off the solder
flux the tab
install bolt through tab and place on wood block
apply iron to corner of bolt and tab...solder should flow from below to make a nice silver ring around bolt head with no extra solder. If using an iron, be sure a small amount of solder is on the tip to make a thermal "bridge" from the iron to the part or it will take forever to get things to flow. A SOLDER BRIDGE IS A MANDATORY TECHNIQUE FOR SUCCESSFUL SOLDERING WITH AN IRON
alternately, with a propane torch, just wave back and forth over the assembly...flux will sizzle and then solder will flow. Don't dwell or overheat.
ideally you'll use flux-cored eutectic solder (63/37) which is electronic grade and is a solder which goes from solid to liquid in a very small range of temperature. Normal solder has a very long plastic stage and you do not want that. Also, find RMA (Rosin, Mildly Activated) flux to use NOT ACID FLUX.
RMA flux and 63/37 solder may have to be bought from the internet as you are unlikely going to find it at a Hardware store.
All clean up is done with alcohol.
AVOID LEAD-FREE SOLDER...you're not eating off of this, so there is no need to go through the agony and overheating of your parts trying to use the stuff.
Finally...for the bottom strip...determine which rivet your wire goes through (either left side or center). Clean, flux and tin the contact strip at the appropriate location. Flux and tin the wire. ONLY AFTER TINNING IS THE STRIP INSTALLED ONTO THE PLASTIC. Bring wire up and once it's through the rivet, form as necessary, flux and reflow solder to get a good joint. A good joint will be bright and you'll still see the wire strand lay in the wire. Clean with alcohol and you're good to go.
Re: Using composite Coil Box rebuild kit from Langs
Posted: Sun Jun 11, 2023 9:22 am
by DanTreace
For easy soldering , used the old wood board and arranged the cleaned contacts and new bolts in order. With a small electric solder iron, easy to solder the contact edge to the bolt head.
As for insertion, transferred each one, in order to the new board, and used a punch on each bolt head and drove that carriage head bolt soldered to the contact into the new plastic insulator board. 
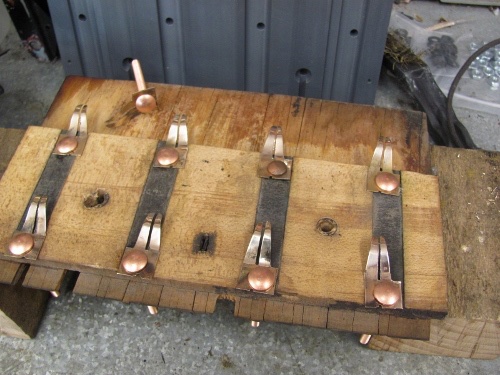
- IMG_7279 (500x375).jpg (109.66 KiB) Viewed 2604 times
- IMG_7284 (500x375).jpg (95.04 KiB) Viewed 2604 times
Re: Using composite Coil Box rebuild kit from Langs
Posted: Mon Jun 19, 2023 2:39 pm
by IanMacLeod
Thank you all, friends, for helping me with this project, Scott Conger- your thoroughness is appreciated. I opted to special order the correct flux and 67/33 solder....project went pretty well, I installed the unit and reattached all wiring & surprise! It all worked! Thanks 1,000,000! C
Re: Using composite Coil Box rebuild kit from Langs
Posted: Mon Jun 19, 2023 2:39 pm
by IanMacLeod
Scott_Conger wrote: ↑Fri Jun 09, 2023 4:51 pm
Chris thanks
simply drawing the bolt in may possibly damage the porcelain tubes
use a small metal stump that fits into the recess and use it along with a vice or press. With the plastic fully supported around the outside, press the bolts home and they will force the plastic to flow and make a nice tight square hole. A small diameter deep-well socket is perfect for this as it will allow the bolt some place to go and will support the plastic very close to where it is being smooshed.
Take this opportunity NOW to sweat-solder your contacts to the underside of the head, allow to cool, clean flux off (use RMA mildly activated rosin flux, not acid!). Now you're ready to press things into place, using care to align the contacts before pressing.
Good solder flow: P5170043.JPG
Fiberglass tape to insulate wire from bottom of box (your wire will likely lay in a different slot, but for your sake, be sure to use the tape to avoid a future short): P1290170.JPG
FWIW, it was a good choice to chose the plastic kit over the wood kit. The increase in reliability far exceeds any perceived downside of using non-original materials...no one wants to be stranded in a downpour.
Welcome to the affliction!
Re: Using composite Coil Box rebuild kit from Langs
Posted: Mon Jun 19, 2023 3:59 pm
by Scott_Conger
You're welcome
I'm glad things went well (that solder flowed nicely, didn't it?)