Page 1 of 1
How I Rebuild Coils- The hard way!
Posted: Mon Jul 03, 2023 3:40 am
by Matt in California
A couple meetings back a fellow club member from a antique car club that I am a member of mentioned he acquired a TT and couldn’t get it to start. He asked if I could test his coils on my tester. I told home I would bring it the next time we meet, but I forgot the tester today today... So he asked if I would take the coils with me. He actually had two sets.
I asked him what set he was trying.

He said the plastic one.

Besides the cracks, broke posts, misaligned points, rusty hardware, bad capacitors and likely needing a jack hammer to remove them... They would be great candidates!
Re: How I Rebuild Coils- The hard way!
Posted: Mon Jul 03, 2023 3:46 am
by Matt in California
The wood coils have great wood boxes. For some reason every box has some scratches in the same place. Any ideas why?
Now the hardware on top leaves lots to desire!
Look at how much this nut rusted! This wrench is the correct for the nut.
It looks like these coils need more than an adjustment!
I plan to show the step by step process that I use to rebuild a coil.
Re: How I Rebuild Coils- The hard way!
Posted: Mon Jul 03, 2023 6:34 am
by Chris Barker
I wouldn't spend much time on the plastic one, but if the secondary coils measure around 3200 ohms, the rest should be restorable with new points and capacitors.
Remove the tiny nails from the bottom of the large side, slide it out, then lever off the narrow side OPPOSITE the coil to access the capacitor and wiring. GigaBytes of advice on this forum!
The scratches come from inerstion and removal from the car coil box.
Re: How I Rebuild Coils- The hard way!
Posted: Mon Jul 03, 2023 10:11 am
by TWrenn
The hardest part for me to rebuild coils is the waiting in line at the post office to send them to Brent Mize!!
Re: How I Rebuild Coils- The hard way!
Posted: Mon Jul 03, 2023 12:10 pm
by DHort
LOL. Brent will like that
Re: How I Rebuild Coils- The hard way!
Posted: Mon Jul 03, 2023 3:04 pm
by Matt in California
TWrenn wrote: ↑Mon Jul 03, 2023 10:11 am
The hardest part for me to rebuild coils is the waiting in line at the post office to send them to Brent Mize!!
Yes I consider sending them off to a reptile rebuilder the easy way

Re: How I Rebuild Coils- The hard way!
Posted: Mon Jul 03, 2023 3:11 pm
by Matt in California
I checked to see if the secondary coils were good and they all passed.
Then I pulled out the nails. I use a knife to get the nails to stick up a bit, then I can pull on them. If they’re really stuck I have gone to cutting them off by slipping eight then ask on the lead in between the cover in the box.
Re: How I Rebuild Coils- The hard way!
Posted: Mon Jul 03, 2023 3:19 pm
by Matt in California
Opened the box and already needing to make a repair.
I find it easier to pull of the side panel to remove the capacitor. I use a knife like this.
That only worked on one. The others still had glue holding them. The others I left a box intact and carefully removed the capacitor and glass.
Re: How I Rebuild Coils- The hard way!
Posted: Mon Jul 03, 2023 3:27 pm
by Matt in California
Now is the time to address the hardware. Fortunately someone had removed most of the nuts. The rusty one that shown above with the wrench I ground off and replaced it with a spare I had from a bad coil. The others I cleaned up with the wire wheel and put marvel mystery oil on.
I like to clean the threads with a die. I had to special order at 12x32tpi Die so I made sure it was extra small so that I could get it to fit in here.
The hardware that fell out I would pull out and hold with a wrench to clean up the threads. But I did get one stuck in it was a pain to get the day off I mean she is a screwdriver from the inside. I will use super glue to hold all the loose studs.
Re: How I Rebuild Coils- The hard way!
Posted: Mon Jul 03, 2023 3:37 pm
by Matt in California
I’ve been blasted all the boxes. Sometimes I like to do that before I attempt to take the hardware off to remove all the rest but didn’t go through that trouble last night. I don’t think the blasting is necessary on all boxes having very clean studs on the top is very important. So when I go to the trouble to do that I clean up the boxes and the contacts on the side. I also like to solder all the contacts on the side because sometimes those can fail.
I installed the capacitors at this point.
Prior to adding capacitor I used a megger to test insulation to assure no leakage between primary and secondary.
Re: How I Rebuild Coils- The hard way!
Posted: Mon Jul 03, 2023 3:55 pm
by Matt in California
At this point I went ahead and used some ink to make the tops black. I used a old toothbrush and a toothpick to get all the areas in the top.
So I get the other hardware ready that should be dry.
Re: How I Rebuild Coils- The hard way!
Posted: Mon Jul 03, 2023 4:08 pm
by Jerry VanOoteghem
Matt in California wrote: ↑Mon Jul 03, 2023 3:04 pm
TWrenn wrote: ↑Mon Jul 03, 2023 10:11 am
The hardest part for me to rebuild coils is the waiting in line at the post office to send them to Brent Mize!!
Yes I consider sending them off to a reptile rebuilder the easy way
Are you saying that Brent is a snake?
Re: How I Rebuild Coils- The hard way!
Posted: Mon Jul 03, 2023 4:22 pm
by TWrenn
Matt in California wrote: ↑Mon Jul 03, 2023 3:04 pm
TWrenn wrote: ↑Mon Jul 03, 2023 10:11 am
The hardest part for me to rebuild coils is the waiting in line at the post office to send them to Brent Mize!!
Yes I consider sending them off to a reptile rebuilder the easy way
Ha ha...I'm sure you meant REPUTABLE!! Chalk it up to good old auto-correct!!
Re: How I Rebuild Coils- The hard way!
Posted: Mon Jul 03, 2023 4:23 pm
by Jerry VanOoteghem
Matt in California wrote: ↑Mon Jul 03, 2023 3:27 pm
Now is the time to address the hardware. Fortunately someone had removed most of the nuts. The one that I shit with the wrench...
Gotta quit the auto-correct...
Nice work with the coils by the way
Re: How I Rebuild Coils- The hard way!
Posted: Mon Jul 03, 2023 5:47 pm
by Luke
It was the wrench-shitting above ground that got me! Gee that must hurt...


Just Passed a Major Milestone
Posted: Mon Jul 03, 2023 6:14 pm
by Ron Patterson
In memory of one of Bruce Mccalley favorite sayings: "for all of you who enjoy a good mess"
Not sure exactly when, but in May of this year I passed what I consider a major milestone.
In thirty-three yeatrs of rebuilding Model T ignition coils i completed the rebuild of my 25,000th coil.
Ron Paatterson
Re: How I Rebuild Coils- The hard way!
Posted: Mon Jul 03, 2023 7:11 pm
by aDave
Now that deserves a WOW. Congratulations.
Re: How I Rebuild Coils- The hard way!
Posted: Mon Jul 03, 2023 7:54 pm
by MKossor
Matt, Nice work documenting your coil rebuild process.
Ron, Congratulations on your 25,000th coil rebuild.
A look back on your past reported milestones and its apparent your picking up speed with all that experience!
Re: How I Rebuild Coils- The hard way!
Posted: Tue Jul 04, 2023 12:56 am
by Matt in California
Congratulations Ron! One of the consequences of me documenting this process is to help people appreciate the labor that you put into rebuilding coils!
And the Rest of you guys are giving me a hard time time! I used to be humbled by the fact of my poor spelling and grammar. Yes auto correct sometimes made it better and other times much worse. When I make posts with photos I use my phone and voice to text. Now I see I can’t speak either! Got to love technology!
Re: How I Rebuild Coils- The hard way!
Posted: Tue Jul 04, 2023 1:15 am
by Duey_C
I like your style Matt! The devil's in the details. Thank you already. Looking for the rest when you're ready.
Congrats Ron!
Re: How I Rebuild Coils- The hard way!
Posted: Tue Jul 04, 2023 10:54 am
by Jerry VanOoteghem
Matt in California wrote: ↑Tue Jul 04, 2023 12:56 am
Congratulations Ron! One of the consequences of me documenting this process is to help people appreciate the labor that you put into rebuilding coils!
And the Rest of you guys are giving me a hard time time! I used to be humbled by the fact of my poor spelling and grammar. Yes auto correct sometimes made it better and other times much worse. When I make posts with photos I use my phone and voice to text. Now I see I can’t speak either! Got to love technology!
Matt,
As someone who also collects antique wind-up phonographs, I often say, "You can't trust anything that doesn't have a crank!" I appreciate your posts and your experiences with these coils.
Re: Just Passed a Major Milestone
Posted: Tue Jul 04, 2023 2:26 pm
by John Codman
Ron Patterson wrote: ↑Mon Jul 03, 2023 6:14 pm
In memory of one of Bruce Mccalley favorite sayings: "for all of you who enjoy a good mess"
Not sure exactly when, but in May of this year I passed what I consider a major milestone.
In thirty-three yeatrs of rebuilding Model T ignition coils i completed the rebuild of my 25,000th coil.
Ron Paatterson
Five of them are mine. The four that I installed are working beautifully, I hope that I never have to use the spare.
Re: How I Rebuild Coils- The hard way!
Posted: Tue Jul 04, 2023 5:25 pm
by Matt in California
I forgot to mention that before I put the capacitor in I use a megger the measure to test that there was no issue on the secondary.
Now is the time to get the contacts on the tap all cleaned up and ready to use. I stole the contacts off of the plastic ones. Likely wire wheeling it looks like these were never used:
I used steel wool to clean the brass a bit.
I use this and four and a 0.005” shim to set the rivet.
Obviously you have to have a pink anvil. The story behind this is when my daughter was three or four years old I was trying to get her interested in blacksmithing
. What is important is that it has a hole drilled in it and I use that to put the contacts in when I am gently hammering on the rivet. I know someone who made some pliers not the ones for sale but ones with parallel jaws and a hole with a hole using a die grinder . I’d like to make a pair eventually.
Re: How I Rebuild Coils- The hard way!
Posted: Tue Jul 04, 2023 6:00 pm
by Matt in California
I use a wire wheel to clean up the bottom contacts. It look like I had a lot of rust but it looks like it was all surface rust.
I also cleaned up the nuts and hardware but decided to make my own brass nuts for the top. Trying to make sure that these can last another hundred years
Added washers to shim the standoff for the upper bridge.
Old coil with updated hardware!
Re: How I Rebuild Coils- The hard way!
Posted: Tue Jul 04, 2023 8:29 pm
by Matt in California
I tested coils and did a basic tune before adding tar. I didn’t want to find an issue after.
Time for the tar. I use a small Japanese cast iron tea kettle on an electric hotplate. The hot plate is not very powerful so I don’t have issues with tar boiling out, but it is slow.
Re: How I Rebuild Coils- The hard way!
Posted: Tue Jul 04, 2023 9:53 pm
by Wayne Sheldon
Ron P, Twenty-five thousand model T coils! Criminy! That is enough for more than six thousand model Ts! And those you have taught have done how many more?
Thank you Ron P, thank you!
Re: How I Rebuild Coils- The hard way!
Posted: Wed Jul 05, 2023 12:12 am
by Matt in California
I like to use dark walnut wood stain on coils that have been stripped down. This in my opinion makes the coils look similar original ones that have not been stripped down and are in good shape.
Re: How I Rebuild Coils- The hard way!
Posted: Wed Jul 05, 2023 2:48 am
by Duey_C
Your megger on the secondary winding test taught me something. You showed a very nice photo above.
A coil I had been "playing with" showed a 3.65 so in the ballpark I think.
Thank you on many details!
Re: How I Rebuild Coils- The hard way!
Posted: Wed Jul 05, 2023 6:18 am
by Poppie
Hi Matt, Can you fill us in re megger test on the secondary and what voltage is applied by the megger? This is a very constructive thread and the members will learn a lot. Looking forward to tomorrows post.....n
Re: using a megger
Posted: Wed Jul 05, 2023 12:29 pm
by Matt in California
You can find info on using a megger on coils here:
http://www.mtfca.com/discus/messages/25 ... 1329803721
Ron Patterson wrote:
Their are two places high voltage shorts occur in Model T coils. To check for them you have to remove the coil points and the capacitor. Use a 1000volt Meggar and test between points C & E for a short between the primary and secondary winding and between iron core and point E for a short between the primary winding and iron core.
Ron the Coilman
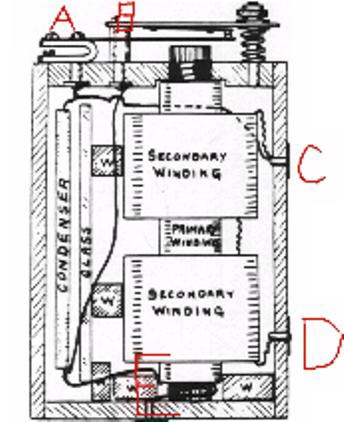
- 009D2D9E-EB3B-4456-9E16-F7919A8B2DA1.jpeg (66.14 KiB) Viewed 11222 times
And for more details on what a megger does:
Garnet wrote:
A megger is a high voltage insulation tester. It will provide an indication of a short or path between conductors in situations where where a regular ohmmeter won't due to its low voltage.
Before you go to the bother of replacing the capacitor in an old coil, you want to be sure there are no internal opens or shorts in the windings. Checking for open circuits can be done with a regular ohmmeter, however testing for a short circuit must be done with a megger. This is done with the contacts removed which electrically separates the two windings. The megger will indicate the electrical relationship between the two windings. Any coil that fails this testing is relinquished to the garbage pile. If the trouble is an open circuit, it can be further checked to see if the problem is outside of the windings (and repairable) or inside the windings (basically unrepairable).
Internal shorts and even opens can be successfully repaired but there are no guarantees as to how long it will function. I regularly repair vintage radio headsets that are open circuited. Some are repaired permanently - others work for awhile and then revert back to their previous condition)
Garnet
Re: How I Rebuild Coils- The hard way!
Posted: Wed Jul 05, 2023 1:03 pm
by Matt in California
Duey_C wrote: ↑Wed Jul 05, 2023 2:48 am
Your megger on the secondary winding test taught me something. You showed a very nice photo above.
A coil I had been "playing with" showed a 3.65 so in the ballpark I think.
Thank you on many details!
Duane,
Depending on the manufacture you want to read 2-4 kohms. (Nominal values of 3300 ohms for Ford and 2100 ohms for some KW.) I made this chart (based on John Carters diagram) with the idea of number each coil and testing them. The chart can be filled in as the coils are rebuilt.
For a printable copy:
Re: How I Rebuild Coils- The hard way!
Posted: Wed Jul 05, 2023 1:13 pm
by Paperman
What does everyone use for insulating washers on the spring post? Also, I noted your caps are red, not the standard orange as supplied by most vendors. Do you prefer your cap over the orange for any particular reason? Thank you for the post.
Re: How I Rebuild Coils- The hard way!
Posted: Wed Jul 05, 2023 3:00 pm
by Matt in California
Paperman wrote: ↑Wed Jul 05, 2023 1:13 pm
What does everyone use for insulating washers on the spring post? Also, I noted your caps are red, not the standard orange as supplied by most vendors. Do you prefer your cap over the orange for any particular reason? Thank you for the post.
I used the washers because they came with the plastic coils that I stole the hardware from. The washes on the bottom are needed so the spring doesn’t go through the hole, but I agree they are not needed on top and would give me room for a lock nut, so I might switch that out.
These are the capacitor sold by Chaffin’s Garage. According to what I know these exceed requirements what is needed. I believe there are three styles that seem to work well currently sold by Lang’s, Snyder’s or Chaffin’s.
Re: How I Rebuild Coils- The hard way!
Posted: Wed Jul 05, 2023 8:05 pm
by Ron Patterson
To properly test a Ford coil for inter winding HV shorets with a Megger you have to remove the Capacitor from the circuit.
The capacitor appears to the 1000 VAC AC developed by the meggar as a chort.
See attached comparative Meggar reading for good and bad coils.
Re: How I Rebuild Coils- The hard way!
Posted: Wed Jul 05, 2023 11:15 pm
by Poppie
Yes Ron, and you would also have to break the H T(secondary) winding connection with the LT(primary) winding at the timer terminal on the coil. The 1000v megger test across the point screws would most probably show a short and the same with a megger test from the LT(primary) winding to the steel core. Surely a low voltage k ohm test would suffice. ....n
Re: How I Rebuild Coils- The hard way!
Posted: Thu Jul 06, 2023 10:06 am
by Scott_Conger
Surely a low voltage k ohm test would suffice
and yet, it doesn't.
I had the occasional coil which by all tests were perfectly suited for rebuild and were perfect after rebuilding...all tests except the "does it reliably throw a spark after it's done being rebuilt" test.
after introducing the Megger test, I would toss out about 3 in 100 coil cores, and after tossing those 3 failures, rebuild results went to 100%...no more internal shorts. I eventually quit doing coils in those numbers because there were too many folks doing a very good job of it for far less than I wanted to do them for...God Bless Them.
Now I only do my own. And a Megger is part of the testing process.
If one were to only do a few coils for themselves, the likelihood of needing a Megger is very low, but if you're doing a lot, the first dud coil after rebuild was more labor cost than a cheap Megger costs.
Re: How I Rebuild Coils- The hard way!
Posted: Thu Jul 06, 2023 5:54 pm
by Matt in California
Scott_Conger wrote: ↑Thu Jul 06, 2023 10:06 am
... I eventually quit doing coils in those numbers because there were too many folks doing a very good job of it for far less than I wanted to do them for...God Bless Them.
Now I only do my own. And a Megger is part of the testing process.
Scott, Thanks for sharing your experience! I agree, what people charge is cheap compared to the work it takes! It looks like I will have a days work in four coils.
Ron, I used an electronic megger. I like your hand crank one. What brand is your megger?
Re: How I Rebuild Coils- The hard way!
Posted: Fri Jul 07, 2023 1:46 am
by Matt in California
I let the stain significantly dry. Time for boiled linseed oil.
Re: How I Rebuild Coils- The hard way!
Posted: Fri Jul 07, 2023 6:24 am
by Poppie
Matt and Scott, Could please explain your testing procedure using the high voltage Megger (R) to weed out your 3% of dud coils to the garbage bin. Please indicate what and where you test the coil. Thanks for your time....n
Re: How I Rebuild Coils- The hard way!
Posted: Fri Jul 07, 2023 7:34 am
by MKossor
Wow

Re: How I Rebuild Coils- The hard way!
Posted: Fri Jul 07, 2023 8:11 am
by Ron Patterson
Poppie, everything you need to know about Megger testing coils is in the two photos I postd above. Look closely Notice the points and capacitor have been removed. the Secondary winding is connected to the short top bolt(with wire) and the Primary winding is the wire that was connected to the internal bottom of the winding. As Matt pointed out you will likely only find this HT/LT winding fault in every 10o or so coils. Do not be surprised if you dont immediately find one.
Matt, my 1000 Volt Megger is a Chinese made unit. $56 on Ebay. Handle it carefully, it is a precision instrument. I got my Megger experience in the telephone outside cable plant industry. A experienced Megger operator can calculate and find the location of a shorted wire pair in a several mile long cable to within a few feet.
The only thing I never investigated in detaili is at what exact Megger ohm reading a coil will or will not arch over between the Primary and Secondary windings.Probably varies between coils.
Have fun and be careful, a Megger will give you a helluva jolt if you get your fingers touching thre wrong place at the right time!!!!!!!!!.
Ron Patterson
Re: How I Rebuild Coils- The hard way!
Posted: Fri Jul 07, 2023 8:49 pm
by Matt in California
Poppie, if you look at the post from July 5th at 12:29 pm there are images that should answer your question. But basically you need to remove/disconnect capacitor and contacts and measure place megger across these points. I also connected from secondary to core.
Ron, very interesting how the merger is used on phone lines! I use a digital meager and was looking to buy a used analog one from Ebay. I am confused because in your photos and on eBay I see the needle in different positions even when it is not cranked.
Matt
The worse thing- how to kill a coil.
Posted: Sun Jul 09, 2023 8:55 pm
by Matt in California
What causes a coil to go bad?
One thing we should discuss is how coil insulation fails. This may be obvious to those with experience. In my opinion, one of the worst things that can be done to a coil is running it without a spark gap. I believe this is the main cause of secondary coil failures. If a coil is run without a spark gap it destroys the insulation and issues can often be detected using a megger.
Looking forward to your input!

