Page 1 of 1
Radiator Mounting Hardware
Posted: Wed Oct 09, 2019 1:07 am
by RustyFords
I’m a bit flummoxed as to how the radiator mounting hardware goes on my 24 Touring.
My car came with a farm patchwork of nuts and bolts holding down the radiator that wasn’t doing a very good job. However I secured a more stock appearing set that is nicely weathered to match my car and now that my new Berg’s radiator is here, I want to get it mounted.
Can someone please help me figure out the order that the various pieces are installed and how the radiator and shell fit into that order?
Re: Radiator Mounting Hardware
Posted: Wed Oct 09, 2019 1:24 am
by John E. Guitar
I changed these on my 26 last month.
Here are some drawings from a previous thread. From memory the studs are slightly longer on the 26/27 kit but the rest is the same.
- 191291.jpg (22.61 KiB) Viewed 5468 times
- 191292.jpg (31.76 KiB) Viewed 5468 times
Now might be a good time to replace those studs as they look a bit flogged out.
I used a couple of prybars to push the studs upwards to get the nuts on. In hindsight a couple of wedges with string for removal would have been easier.
Re: Radiator Mounting Hardware
Posted: Wed Oct 09, 2019 7:19 am
by Mark Nunn
Martynn made a drawing of this assembly too.
app.php/gallery/image/90
Re: Radiator Mounting Hardware
Posted: Wed Oct 09, 2019 7:47 am
by Humblej
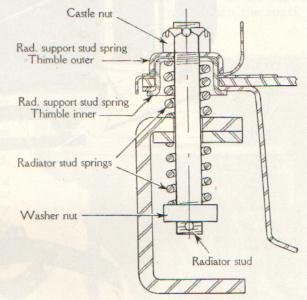
Assemble the lower portion first in the frame cavity, stud, spring, square piece, and cotter pin. Use a chisel or wedge to jack up the lower assembly for the stud to sit higher. This will help to align all the upper parts and have some length of stud to get the top nut started. Once it is all tightened up the chisel will fall out.
Re: Radiator Mounting Hardware
Posted: Wed Oct 09, 2019 9:14 am
by John kuehn
Using a wedge or chisel is good advice to raise up the stud enough to start the nut! In my mind the studs should have been about 1/4”longer or so. My opinion of course.
I wonder how Ford did it on the assembly lines but it seems like they would have some sort of tool to quickly get the job done.
Re: Radiator Mounting Hardware
Posted: Wed Oct 09, 2019 9:29 am
by Charlie B in N.J.
Humble & John are right on. Boy did I bust my butt before thinking of doing that. Just make sure you can remove anything you use as a wedge after assembly.
Re: Radiator Mounting Hardware
Posted: Wed Oct 09, 2019 11:17 am
by RustyFords
Thanks for all the help everyone...I sincerely appreciate it.

Re: Radiator Mounting Hardware
Posted: Wed Oct 09, 2019 11:52 am
by Mark Gregush
The latter cars got a longer bar instead of the little square piece, made it easier to install and remove. The kits use the longer bar. With the small square piece, sometimes it is hard to reach down and keep it from turning when taking out or installing radiator.
Re: Radiator Mounting Hardware
Posted: Wed Oct 09, 2019 1:47 pm
by George N Lake Ozark
When I changed my hardware last year I found the included springs were too long so I cleaned and painted and reused my old ones. Worked like a charm.
Re: Radiator Mounting Hardware
Posted: Wed Oct 09, 2019 5:41 pm
by John kuehn
Come to think of it I reused two of the springs when I bought a new kit for my 24 Coupe. I also have seen a thread that a guy used the later bottom square pieces so it would be easier to tighten up. Maybe the kits weren’t made as close to the originals but the guys on Fords assembly line must have had a technique to install the radiator on the moving line and certain tools to do it. I guess I’m just old and slow! Maybe that’s it!
Re: Radiator Mounting Hardware
Posted: Wed Oct 09, 2019 7:48 pm
by art32mor
Get rid of those short bar nuts get the longer ones you'l thank me later