Page 1 of 1
Timer Brush Installation
Posted: Fri Oct 20, 2023 3:37 pm
by TimCarlson92
Good afternoon!
I am attempting to install a new timer on my 24 coupe. I purchased a roller timer Snyder's. I'm having a bit of difficulties when it comes to the installation of the brush. I placed the brush on, inserted the pin, with a bit of difficulty, and the roller brush does not freely move. It appears as though the roller arms are pressed right up against the metal around where the brush slides under on the camshaft (forgive me if that is as clear as mud) When I put the little washer shroud piece in and the nut, tighten it down, the roller arm does not move at all. What am I missing here, what is wrong? Any help would be greatly appreciated. Thank you!
Re: Timer Brush Installation
Posted: Fri Oct 20, 2023 3:47 pm
by speedytinc
Odd situation.
Roller brush, not anderson flapper style brush?
The anderson brush takes a modified cap.
The regular roller brush cap will lock the finger up.
A picture of your brush installed might be more enlightening.
Re: Timer Brush Installation
Posted: Fri Oct 20, 2023 3:52 pm
by TimCarlson92
speedytinc wrote: ↑Fri Oct 20, 2023 3:47 pm
Odd situation.
Roller brush, not anderson flapper style brush?
The anderson brush takes a modified cap.
The regular roller brush cap will lock the finger up.
A picture of your brush installed might be more enlightening.
Yes, it's a roller brush. Is there a washer of some sort that is supposed to be behind the brush on the cam shaft?
Re: Timer Brush Installation
Posted: Fri Oct 20, 2023 4:01 pm
by John kuehn
Do you mean the round roller between the two arms isn’t turning?
I think you mean when you installed the roller assembly on the camshaft and inserted the pin that holds it in place you noticed the roller wouldn’t turn easily.
The term brush term is used when you have a New Day timer. It has a brush that presses against the timer case face contacts and is stationary.
Original style roller timers like the one you bought from Snyder’s has the roller which make the contact around the inside of the case. It rolls around.
Re: Timer Brush Installation
Posted: Fri Oct 20, 2023 4:06 pm
by TimCarlson92
speedytinc wrote: ↑Fri Oct 20, 2023 3:47 pm
Odd situation.
Roller brush, not anderson flapper style brush?
The anderson brush takes a modified cap.
The regular roller brush cap will lock the finger up.
A picture of your brush installed might be more enlightening.
Could it be indicative of a bigger problem, such as a camshaft issue? It almost seems as though the cam shaft has moved back into the engine block slightly, causing issues with the position of the roller brush.
Re: Timer Brush Installation
Posted: Fri Oct 20, 2023 4:08 pm
by TimCarlson92
John kuehn wrote: ↑Fri Oct 20, 2023 4:01 pm
Do you mean the round roller between the two arms isn’t turning?
No, the roller is turning, but the arm itself is not moving, allowing for the spring action of the roller and arm assembly to function. It's like it's pressed too close to the engine making the arm immovable. Roller works fine.
Re: Timer Brush Installation
Posted: Fri Oct 20, 2023 4:16 pm
by John kuehn
Remove the roller, use some oil to lubricated and press see it in and out so it will begin to move freely. It’s braded to tight it seems.
Re: Timer Brush Installation
Posted: Fri Oct 20, 2023 4:19 pm
by TimCarlson92
John kuehn wrote: ↑Fri Oct 20, 2023 4:16 pm
Remove the roller, use some oil to lubricated and press see it in and out so it will begin to move freely. It’s braded to tight it seems.
Here's the weird part, it moves just fine once it isn't installed.
Re: Timer Brush Installation
Posted: Fri Oct 20, 2023 4:24 pm
by Mark Gregush
If the cap is pushing on the arm, file a little off the one side.
Re: Timer Brush Installation
Posted: Fri Oct 20, 2023 4:53 pm
by John kuehn
You mentioned when you installed the roller assembly it was a little difficult pushing the pin in. I can’t tell from here of course but maybe it was a little hard to get the pin in is because the roller assembly isn’t going on far enough and the pin won’t easily go in.
You might try taking a little off the assembly on the side that goes against the block so it will go on a bit more. Just guessing but it would allow the roller to free up inside the case??
Re: Timer Brush Installation
Posted: Fri Oct 20, 2023 5:04 pm
by speedytinc
Cam gear?
A thicker cam gear hub can keep the cam nut from compressing far enough.
Common problem with the nylon gear. Requires a shortening of the cam nut, as I recall.
Same problem if the nut backed off & is loose.
Which gear do you have?
The roller should be resting on the cam step, not the edge of the nut.
Re: Timer Brush Installation
Posted: Fri Oct 20, 2023 5:23 pm
by TimCarlson92
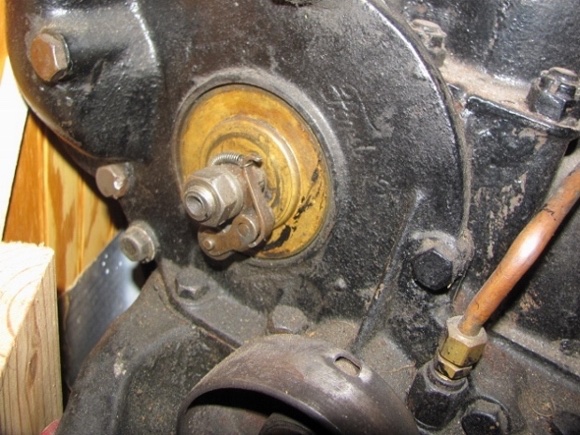
Here's a photo of it to maybe better help! Installed with the cam nut tight, there is no movement to the roller arm assembly at all. Roller moves freely.
Re: Timer Brush Installation
Posted: Fri Oct 20, 2023 6:06 pm
by Oldav8tor
Does your engine have a modern neoprene camshaft seal? I have a New Day and I know that when you use a modern seal you don't use the large brass washer / shield over the camshaft.
Re: Timer Brush Installation
Posted: Fri Oct 20, 2023 6:14 pm
by John kuehn
Remove the brass shield and then see if it frees up the roller. It’s too close from the photo.
If it’s rubbing the roller then remove it and install the modern press in seal.
Re: Timer Brush Installation
Posted: Fri Oct 20, 2023 6:20 pm
by TimCarlson92
Oldav8tor wrote: ↑Fri Oct 20, 2023 6:06 pm
Does your engine have a modern neoprene camshaft seal? I have a New Day and I know that when you use a modern seal you don't use the large brass washer / shield over the camshaft.
No, it's the old style felt. Thank you for your input and help!
Re: Timer Brush Installation
Posted: Fri Oct 20, 2023 6:23 pm
by TimCarlson92
John kuehn wrote: ↑Fri Oct 20, 2023 6:14 pm
Remove the brass shield and then see if it frees up the roller. It’s too close from the photo.
If it’s rubbing the roller then remove it and install the modern press in seal.
John,
I will do this and get back to all of you on this thread with an update. Thanks to you and Tim for your continued help and guidance with my first T experience. It's been beyond helpful and I am extremely thankful for this kind, eager community.
I will post updates for you all!
Also, I have begun the rewiring process as well. I've removed all of the old wiring and have all new wiring in hand.
Re: Timer Brush Installation
Posted: Fri Oct 20, 2023 6:38 pm
by speedytinc
Looks like the roller body pivot arm is hitting the cam gear nut edge @ the rear.
Re: Timer Brush Installation
Posted: Fri Oct 20, 2023 6:40 pm
by RajoRacer
Just a "FYI" - that bolt directly below the timer should be reversed - bolt head on top w/nut at the bottom.
John's on the right track with the cam gear hub thickness - photo appears that the roller body is against the cam gear retaining nut !
Re: Timer Brush Installation
Posted: Fri Oct 20, 2023 6:57 pm
by TimCarlson92
speedytinc wrote: ↑Fri Oct 20, 2023 6:38 pm
Looks like the roller body pivot arm is hitting the cam gear nut edge @ the rear.
I think so too. In comparison to the old roller brush, the arms are much larger
Re: Timer Brush Installation
Posted: Fri Oct 20, 2023 8:18 pm
by TimCarlson92
RajoRacer wrote: ↑Fri Oct 20, 2023 6:40 pm
Just a "FYI" - that bolt directly below the timer should be reversed - bolt head on top w/nut at the bottom.
John's on the right track with the cam gear hub thickness - photo appears that the roller body is against the cam gear retaining nut !
What do I do to address this issue?
Re: Timer Brush Installation
Posted: Fri Oct 20, 2023 8:46 pm
by JBog
Well I had an issue with the piece that goes over the pin before putting the nut on. I had to take a dremel and cut a notch on mine to allow the arm to fully articulate.
Re: Timer Brush Installation
Posted: Fri Oct 20, 2023 9:24 pm
by TimCarlson92
JBog wrote: ↑Fri Oct 20, 2023 8:46 pm
Well I had an issue with the piece that goes over the pin before putting the nut on. I had to take a dremel and cut a notch on mine to allow the arm to fully articulate.
In the photo, the left side is hanging up on the metal ridge. I’ve filed it down to see if it’ll help, but it hasn’t. I’ve got an ANCO timer coming shortly that if and when this one becomes and issue I’ll replace it with that. I’ve just decided it’ll have to do for now lol
Re: Timer Brush Installation
Posted: Sat Oct 21, 2023 10:14 am
by DanTreace
Might try again to check the felt behind the brass shield. If the felt is new it will be too thick and push the shield out, so that keeps the rotor barrel from seating fully. Felt should be rubbed with grease to flatten it some for fit. And others have found reproduction shields aren't exactly to shape with the inner cup for the felt a bit too tall.
- IMG_2361 (630x473) (590x443) (580x435).jpg (141.36 KiB) Viewed 5674 times
Re: Timer Brush Installation
Posted: Sat Oct 21, 2023 11:17 am
by Oldav8tor
Consider installing a modern press-in camshaft seal. After removing the felt, clean with solvent before installation. Some guys use a small amount of Ultra black to secure it. As mentioned before, you can then discard the brass shield.
Re: Timer Brush Installation
Posted: Sat Oct 21, 2023 3:10 pm
by TimCarlson92
John kuehn wrote: ↑Fri Oct 20, 2023 4:01 pm
Do you mean the round roller between the two arms isn’t turning?
I think you mean when you installed the roller assembly on the camshaft and inserted the pin that holds it in place you noticed the roller wouldn’t turn easily.
The term brush term is used when you have a New Day timer. It has a brush that presses against the timer case face contacts and is stationary.
Original style roller timers like the one you bought from Snyder’s has the roller which make the contact around the inside of the case. It rolls around.
John, I took the radiator off to get a better view of what I was doing. Well, look at the attached photo. There's my issue. Suggestions?
Re: Timer Brush Installation
Posted: Sat Oct 21, 2023 3:51 pm
by John kuehn
If I’m looking at your latest photo it sure looks like the timing gear cover is off center?
If that’s the issue of your binding roller timer I wonder how your car ran to begin with.
The cam is probably in the correct position in the block itself but the timing gear cover is visibly way off on one side. In other words the timer itself is “off center” but the roller assembly is correct.
I would get another timing gear cover. They are fairly plentiful and inexpensive. Call Lang’s T parts and they probably have a good one. They keep lots of good used T parts. I can’t recall a cover being that far off before. The cam hole is probably correct but the area where the timer sits is way off to one side.
Re: Timer Brush Installation
Posted: Sat Oct 21, 2023 3:54 pm
by TimCarlson92
John kuehn wrote: ↑Sat Oct 21, 2023 3:51 pm
If I’m looking at your latest photo it sure looks like the timing gear cover is off center?
If that’s the issue of your binding roller timer I wonder how your car ran to begin with.
The cam is probably in the correct position in the block itself but the timing gear cover is visibly way off on one side.
I would get another timing gear cover. They are fairly plentiful and inexpensive. Call Lang’s T parts and they probably have a good one. They keep lots of good used T parts. I can’t recall a cover being that far off before. The cam hole is probably correct but the area wher the timer sits is way off to one side.
Thank you, John. The metal sleeve around the cam shaft…is that another part that I’d need? I worry that because it’s so far off that it has ruined something behind the cover
Re: Timer Brush Installation
Posted: Sat Oct 21, 2023 4:04 pm
by TimCarlson92
John kuehn wrote: ↑Sat Oct 21, 2023 3:51 pm
If I’m looking at your latest photo it sure looks like the timing gear cover is off center?
If that’s the issue of your binding roller timer I wonder how your car ran to begin with.
The cam is probably in the correct position in the block itself but the timing gear cover is visibly way off on one side. In other words the timer itself is “off center” but the roller assembly is correct.
I would get another timing gear cover. They are fairly plentiful and inexpensive. Call Lang’s T parts and they probably have a good one. They keep lots of good used T parts. I can’t recall a cover being that far off before. The cam hole is probably correct but the area where the timer sits is way off to one side.
I should also note that the metal sleeve around the cam shaft is also off center itself. The gap around the cam shaft is smaller on the right upper side.
Re: Timer Brush Installation
Posted: Sat Oct 21, 2023 4:44 pm
by Moxie26
Is the timing gear nut snug, or loose? It would shorten the distance when loose needed for commutator flapper or roller to fit properly on camshaft.
Re: Timer Brush Installation
Posted: Sat Oct 21, 2023 4:50 pm
by TimCarlson92
Moxie26 wrote: ↑Sat Oct 21, 2023 4:44 pm
Is the timing gear nut snug, or loose? It would shorten the distance when loose needed for commutator flapper or roller to fit properly on camshaft.
I have not taken the cover off yet but I am sure it is loose, by the appearance of it. I'm trying to get as much direction as possible before I tear into it completely. I have zero beforehand knowledge on any of this. I'm going in blind!
Re: Timer Brush Installation
Posted: Sat Oct 21, 2023 5:02 pm
by Moxie26
Looking at the end of the camshaft the number of threads showing is a lot less than in the other picture from another poster. This would show a possibility of that cam gear nut being loose and the flange on that nut is probably grinding on the inside of that timing cover with the two camshaft dowel pins retaining position of the gear. After removing the cam cover and retightening that cam gear bolt, you'll need a centering gauge and gaskets along with that neoprene seal . Removing the radiator will give you a lot more room to replace what's needed .
Re: Timer Brush Installation
Posted: Sat Oct 21, 2023 5:09 pm
by TimCarlson92
Moxie26 wrote: ↑Sat Oct 21, 2023 5:02 pm
Looking at the end of the camshaft the number of threads showing is a lot less than in the other picture from another poster. This would show a possibility of that cam gear nut being loose and the flange on that nut is probably grinding on the inside of that timing cover with the two camshaft dowel pins retaining position of the gear. After removing the cam cover and retightening that cam gear bolt, you'll need a centering gauge and gaskets along with that neoprene seal . Removing the radiator will give you a lot more room to replace what's needed .
Where can I get a centering gauge? And by gaskets do you mean gaskets for the timing cover? Just asking for clarification and making sure I have everything gathered up!
Re: Timer Brush Installation
Posted: Sat Oct 21, 2023 5:23 pm
by John kuehn
Go to Lang’s Model T Ford website.
They have the timing cover centering tool and necessary gaskets if you need to remove the cover or loosen the cover bolts and see if it will center up.
You can tell by looking at the cover that when it was made the lips where the timer case sits in aren’t the same width all the way around.
Most if not all the cover pictures you can see on the net or the covers that I have aren’t that far off. The ridges or lips that I call them are the same width all the way around. But that’s my opinion and others may disagree.
Try the centering tool first and you’ll know pretty quick if it doesn’t easily go on. Or if it goes on at all.
Re: Timer Brush Installation
Posted: Sat Oct 21, 2023 5:26 pm
by speedytinc
The question remains.
What kind of timing gear?
It may be the type with too thick a hub, not allowing the cam gear nut to seat deep enough.
Re: Timer Brush Installation
Posted: Sat Oct 21, 2023 5:26 pm
by Moxie26
Taking into account that you have ordered from Snyder's antique auto parts, they do have the camshaft centering gauge, and They do have the gaskets. ..... and the only thing extra would be a little adhesive over the counter at your local auto parts supply store. You can discuss with Snyder's representative what you're doing and quite possibly they could help you with the installation procedure.
Re: Timer Brush Installation
Posted: Sat Oct 21, 2023 7:01 pm
by Moxie26
Tim.... You can go to the homepage of the Model T Ford club America site and find out what chapter is in your vicinity... Some members with hands-on experience may be available to give you help in person. I'm about 7 hours away from you, maybe there's someone that's a little bit closer..... But I'm willing to help on the forum or by telephone. Bob J. ,.......*********. There may be a possibility that your front cam bearing is worn ...... Preventing cam to run in the true circle and also giving your engine the uneven output you mentioned. ***********
Re: Timer Brush Installation
Posted: Sat Oct 21, 2023 9:32 pm
by Oldav8tor
There are also two MTFCI chapters in PA - I second the idea of joining a local club. They can be a great source of advice and assistance.
Re: Timer Brush Installation
Posted: Sat Oct 21, 2023 9:58 pm
by TimCarlson92
Thank you all!
I'll look more into the local chapter, the problem I have is that I live in the middle of nowhere. It's nice because it's my great grandparents farm but everything handy is forever and a day away.
Here's the update on the interesting situation at hand...I removed the camshaft cover. The camshaft lock nut was somehow cross threaded, which caused damage to the cover and two of the threads of the camshaft itself. I'm hoping to thread those, with assistance, of course, to be able to get a new camshaft nut to seat properly. I also discovered that the camshaft gear has been replaced with a composite one. It also appears to be damaged. My plan is to replace that as well. Should I replace it with a metal gear or another composite gear? I'm sure there are a million opinions on that as well but, I eat up suggestions!
Again, thank you all for your help. This community rocks!
Re: Timer Brush Installation
Posted: Sat Oct 21, 2023 10:08 pm
by Bill Robinson
This is what happens to both composite gears and nylon gears. If you plan on driving your Model T, then my advice- go with bronze or aluminum. I prefer bronze- some members here say the aluminum ones "ring", but I've never run aluminum, so I can't say.
Re: Timer Brush Installation
Posted: Sat Oct 21, 2023 10:56 pm
by speedytinc
A Dan Mceachern bronze gear is the best available. Best quality.
Re: Timer Brush Installation
Posted: Tue Nov 07, 2023 7:56 pm
by TimCarlson92
Just to give everyone and update on this situation so that others may find this if needed in the future..
Could not get the Roller brush to seat properly on the camshaft. After digging, discovered that the camshaft lock nut had somehow backed off from the camshaft timing gear and became cross threaded. It wore a grove into the timing gear cover and the camshaft timing gear itself.
Solution was to fix threads (thankfully able to file them back to a useful state, replaced camshaft timing gear with a bronze Dan Mceachern gear, replace camshaft lock nut, replace timing cover and reassembled the car. Runs like new.
Special thanks to all who offered guidance and assistance through this odd situation that I experienced! You're all invaluable!
Re: Timer Brush Installation
Posted: Tue Nov 07, 2023 10:08 pm
by Moxie26
Wow! That was a quick fix. Enjoy and happy motoring !
Re: Timer Brush Installation
Posted: Tue Nov 07, 2023 11:03 pm
by Mark Gregush
Glad you got it figured out!
Re: Timer Brush Installation
Posted: Wed Nov 08, 2023 4:30 pm
by Allan
The "metal sleeve" is part of the camshaft nut. It is what the modern seal runs on. If it is damaged/ pitted, the old felt seal may be the better option.
The cover does look to be installed off-centre. Do not be concerned about the machining in the cover being offset to the casting. This is common. The answer may be in removing the cover and re-installing it with a centering tool to set it up correctly. With the cover off, you could install a new cam nut with a smooth seal surface.
Hope this helps.
Allan from down under.
Re: Timer Brush Installation
Posted: Thu Nov 09, 2023 8:09 pm
by TimCarlson92
Moxie26 wrote: ↑Tue Nov 07, 2023 10:08 pm
Wow! That was a quick fix. Enjoy and happy motoring !
Ha! What a whirlwind! Also in that time I took the opportunity to replace every inch of wiring in the car. Installed four new coils as well. I'm going to do a rebuild on the coil box next as I have some odd sparks at the carb adjusting rod now lol
Re: Timer Brush Installation
Posted: Thu Nov 09, 2023 8:46 pm
by Moxie26
Congratulations Tim !!!! Coil Box plastic replacements and re-using the internal terminals next.