Making your own side curtains is probably a good idea. Most home sewing machines will sew top material provided they have the proper needle. You will need a needle specifically designed for sewing leather. They have more of a chisel point, to puncture the material. If your existing machine cannot handle it (unlikely) you may be able to find a vintage (pre-1960) sewing machine inexpensively. Here in the States a vintage Singer straight stitch machine such as a Singer 66 or Singer 15 can generally be found for less than $50, and will do the job. If you go this route, try and obtain one with a reverse stitch function (generally 1930 or newer).
The side curtain fasteners generally attach to the seat upholstery outside tack strip, and the inside of the wooden part of the top bows. You should not need to make holes in the sheet metal. On original 1916 side curtains, each side had two points of fastening to the windshield area. One was a strap that went around the side light. The other was an eyelet on the top edge of the side curtain where it tucked behind the top bow area which hangs in front of the windshield. The eyelet attaches to a "Murphy" type fastener on the inside of the windshield top bow. Because you have clearance issues with your windshield, you may not have enough room for a Murphy fastener on your top bow. Here is a photo of an original 1916 touring with the side curtains installed.
 Viewed 2109 times")
Here is an alternative fastening method shown on a 1919 Model T. I am not sure it is an original design, but if you are making your own curtains, it does not matter, you can adopt the ideas. Here a strap on the top corner of the side curtain snaps to the "storm / wind flap" which is fastened to the inside edge of the top bow and hangs in front of the windshield. The strap that goes around the side light is shown. This example also has straps and cutouts to go around side mirrors and windshield hinge.
 Viewed 2109 times")
 Viewed 2109 times")
Here is a photo of my 1915 roadster, which shows the location of the "Murphy" fasteners installed on the outside seat upholstery tack edge. I installed my side curtains last summer. The curtains I purchased did not have the fasteners installed. I can appreciate your frustration, because without an example to follow, it was hard to determine how the fasteners should be placed. I believe I got it "more or less" correct. I found it helpful to install the "Murphy" fasteners on the outside seat upholstery tack edge first. Then make a paper pattern of the side curtains. Determine the location of the eyelets on the paper pattern first (cut and paste is your friend here), and then transfer the location of the eyelets form the paper pattern to the side curtains.
.jpg (123.8 KiB) Viewed 2109 times")
In a similar fashion, I installed the "Murphy" type fasteners on the appropriate locations of the inside top bows, determined the location of the eyelets on the paper pattern, and then transferred the location to the actual side curtain. My T isn't very accessible at the moment, so I cannot post more photos. But I am happy to help you out any way I can, and can provide more photos in a month or so.
Langs, and other venders, sell the necessary fasteners separately. They also sell a nifty tool (43007T) for installing the eyelets. I am sure you can find both the fasteners and the same type of tool locally, and save on shipping. The tool was expensive, but worth it for me.
I found a photo of the inside of a touring, showing the location of the fasteners, which you might find helpful.
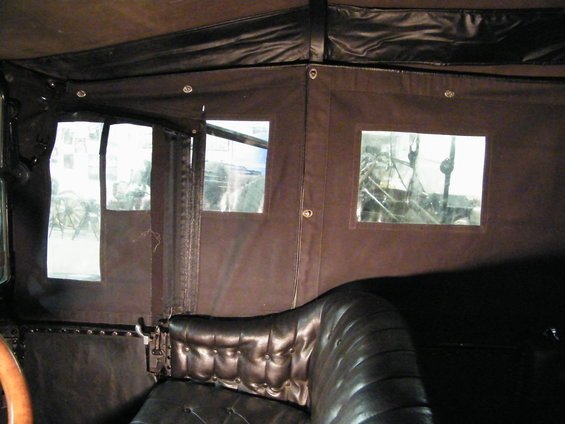
- 76281b.jpg (57.99 KiB) Viewed 2099 times
Good luck & have fun!!


